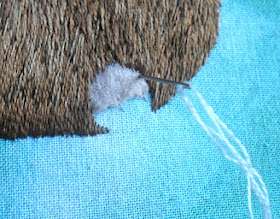
The names for this stitch are many and various and range from turkey stitch, through turkey knots and ghiordes knot stitch to plush work! However, the method is more or less the same and here's how I work it. Others, no doubt, have some differing methods, and feel free to use whichever works best for you. There's rarely only one correct way.=)
Unusually, this stitch starts on the front of the work, rather than the back. (Well, it does for me anyway so that I can use the single end of the thread as part of the pile later on.) Just take your needle through from front to back at a convenient starting point.
Here, if you look very closely, you can see a tiny securing stitch made just in front of the loose end. You'll be making one of these small stitches for each stitch in the area you want to fill with pile.
Bring the needle back through to the front of the work and then take it down again close by, but leave a good sized loop on the front of the work, higher than you want the finished pile to be.
Bring your needle back through to the front again and make a small securing stitch next to your loop. The type of space you're filling and the position of the loop in the space will often dictate where you locate your small stitch - you don't want it to be seen later on.
Here's the whole of the first row worked complete with a securing stitch for each loop. I seem to have used up the piece of thread in this row, so you can see another loose end on the left. Continue on then filling in the whole shape.
This shows the very bottom row of loops, the one that will be on the edge of the shape. That being the case, I've made sure to put the securing stitch the other side of the loop this time so that there's no chance of it being visible once the area is finished. You'll need to decide for yourself if you want, or need, to do this. Sometimes you may even want your tiny stitches to be seen!
This is the whole circle filled with loops and invisible securing stitches.
The next step is to cut off all the tops of the loops. Usually the loops are made somewhat higher than you want the finished pile to be, so quite a bit can be cut off. However, if you're very budget and waste conscious and want to make your threads last etc, then you could just cut through each loop, although that would take quite a bit longer, depending on the area of the shape you've filled. I try to leave as little as I can to cut off (some are hugely wasteful with almost twice as much cut off as left behind!), but I do make my loops a bit too high to leave room for correction etc.
At this stage you will also want to begin to think about shaping the pile vertically. For instance, in this case, I needed the edges of the tail to be shorter than the middle, so it was good to begin shaping at this stage.
Finally, with a fine-toothed comb, comb the pile through. This helps to let you know where there are still some loops intact and that need cutting as well as making it easier to see where and how to continue shaping. I just used a fine hair comb here, but Jane Nicholas recommends one of those eyelash comb/eyebrow brush combos. This seems a good idea and a toothbrush could even be another alternative. Experiment and see what you need for each design.
And here it is - the finished fluffy tail!
Of course, there are more uses for this stitch that just fluffy bunny tails. The grass on this piece was also worked with ghiordes knot stitch. In this case, I needed to change colours and used three different greens, more or less at random to achieve this effect. Here was one time when making sure the securing stitches were out of the way was important. Also, I had to iron the stitches somewhat flat, or else they tended to stick up vertically from the piece when, for once, I didn't want that!
Here is another possible use - fuzzy insect bodies. This one was done by creating double or triple rows of loops in each colour, then cutting and shaping them all in one go before adding in beads for the eyes, fine metallic thread for the legs etc and detached wire-work wings.
There are many other things to use it for - hair, flower centres, hedges etc in knot gardens and several more. See what you can think up and leave any ideas in the comments box to inspire others.=)
Enjoy and don't forget to leave a link on this post to where you've stored a photo of your own go at a fluffy bit!
Text and images: © Elizabeth Braun 2013


Excellent tute - as ever!
ReplyDeleteIt is sooo cute !
ReplyDeletei love the bubble bee
Thank You!!!
ReplyDeleteDeb
wow!! very nice... and thanks for sharing the tutorial as well... I'll try it sometime..
ReplyDelete-Berina
Thank you for an inspirational tutorial. You have shown how very different the stitch can look in the fluffy tail and the straight grass.
ReplyDeleteCropped short it could be moss, kept long it could be the fur of an Afgan dog, or a fringy Charleston dress...
啊...原來兔先生毛茸茸可愛的小尾巴是這樣製作的喔!真是有意思~ 謝謝妳! :-))) judy
ReplyDeleteIt's a great stitch, and more versatile than people think...
ReplyDelete