Monday 30 January 2012

TAST Weeks 3 & 4, XS cat finish and forthcoming attractions

So, here I am, having dragged myself to the sofa to make a blog post!  It's been a bit full on over the last fortnight and I could well understand some of the squads of people who signed up to follow recently wondering if it was worth their while, but I've just had a new boiler and water heating system and a very nasty cold that seems to be making people really quite ill.  Anyway, I was amazed and delighted to see my wired needlelace stumpwork elements tutorial featured in five or six different places and as many people signed up to follow through Blogger in one week as had done in the previous 3+ months!  Welcome to all of you and thank you very much for subscribing.  That goes for those reading through Google Reader, Bloglines and other feeds etc as well.  =)

I finally got my little stitch samples done for TAST weeks 3 and 4 - just in time for the release of weeks 5's stitch tonight!!  As you can see, it's only a few samples on Aida for the time being, as had I planned on doing a piece using all five of January's stitches over the next week or two.  I might still do some, it depends how the inspiration comes and goes and what else there is going on in life!!

So, here you can see the feather stitch samples at the top of the 'sheet' with plain feather stitch, closed feather stitch, double and triple feather stitch worked together and finally feathered chain stitch. I also found a Spanish knotted feather stitch, but just couldn't follow the instructions - not enough diagrams and the start up info was weak.

Underneath we can see six variations on cretan stitch.  The first two are just basic cretan stitch, the second being on a wider scale than the first.  The third sample is cretan stitch at an angle and the last on that row is Scottish cretan stitch, where one works three stitches fairly close together, then threads the needle around the back of the stitches and then move onto the next one.  On the bottom row you can see a rather wonky open cretan stitch leaf (the limitations of Aida again) and then some cretan stitch filling, which looks rather odd here as you work the blocks diagonally and I was using up the odds and ends of thread from the other samples.  It's quite hard to work as the vertical threads are only anchored top and bottom, so it's easy to warp the whole thing out of shape.

I also finished the cute little cat in a basket cross stitch UFO.  It just wants mounting into a card now and that's that one done.


And I started a cross stitched bookmark, which I hope to get finished and handed over this week.  Here's the start of it anyway.

I've been giving some thought to what I'd like to accomplish stitch-wise over the months to come and here are a few of things you can look forward (all being well!!) to seeing on Sew in Love in the near future:

Helen M Stevens' lovely Painted Ladies design from her 'Masterclass Butterflies' book.  This will be made into a cushion/pillow cover for friends.  I'll be working it on black, as shown here from the book and making the edging in a gold ribbon.

I plan to take my first steps in Brazilian embroidery with this kit.  I've already transferred the design onto a piece of white fabric which better suits the thread colours.  I plan to put this into one of those pre-made oval frames as a promised gift for a sweet Japanese lady who put up with us put us up whilst we were in Oxford last month.

This is something that's been sitting kitted up since we were still in Taiwan!  I put it together more than 18 months ago, and I plan to get it going soon too.  It's to be the green version and will be for my mum.  I might make it into a cushion cover for her, but I'll decide on that later - when there finally is something to finish up!=)

And yes, there'll be some stumpwork coming up (even if I didn't like it that much, it would be a shame to disappoint all you lovely new subscribers who came here for the stumpwork content!)

I want to work this achingly cute little bunny as a small gift for a couple who've had a lot of stress of late whilst he's been in and out of hospital with health troubles.  They've finally found out what was wrong, it's been treated and he's now in convalescence, but something to make them smile won't come amiss, I'm sure.  Besides, it's just SO cute, I want an excuse to work it!!  FYI, it's from the Country Bumpkin 'A-Z of Stumpwork' and, whilst I'm on the subject of that book, don't miss the Stiches and Whimsies blog as she's in the process of working the 'Nature's Diner' piece from the same book. 

Finally (for now!) the last two of the five DMC stumpwork kits I had.  When these are all done, the four that will be available (one went in a card a few years ago) will be mounted on cardboard squares and put in a display in our dining area where we have a very blank wall.  The butterfly wings will give me a chance to do a tutorial on wired fabric elements for stumpwork (as opposed to needlelace ones), so look out for that.

I've also started thinking about some very large projects for later on, such as a stumpwork knot garden, some sort of embroidered house and also a 'doll' done as ancient Israel's High Priest.  First though, I have plenty to keep me busy with the above, plus making up the needlepainted dogroses into the finished item and also the needlepoint giraffe I finished up a while ago is all set ready to be sewn up into a scatter cushion/pillow for a disabled lady.

Ready?  Set?  GO!

© Elizabeth Braun 2012

Wednesday 18 January 2012

Assembling a Wired Stumpwork Flower

A couple of days ago I posted a tutorial on creating wired needlelace elements for stumpwork, which you can use for flowers, leaves, insect wings and several other things.  Now it's time to fasten the detached elements to the main fabric and complete the motif.

This is the piece I was working on, the now deleted (waaah!) DMC Stumpwork kit 'Poppy and Beetle'.  Those of you who've been following this project will notice that I re-worked the bud to the original design after all!!  Anyway, the poppy was the only part left to complete and you can see where it's to be located, top left..


The first thing to do was to as near as fill that oval shape with beads as the supplies in the kit allowed.  The instructions actually suggested you do this after attaching the petals, but there were two reasons why I decided to work it the other way around: 1) I think it would be very hard to attach or stitch anything when there are going to be a lot of wire ends from the petals in the way on the back; and 2) One can never be sure that the beads provided would fill the space and, if the petals were already in place, then there could be a gap and/or pattern lines showing.  Yikes!  So, beads came first and were attached with one strand of black thread and a beading needle.


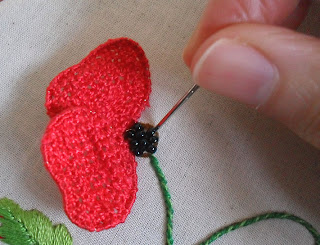
Here you can see me preparing the holes for the third petal.  Using a thick needle, such as a chenille type, punch a couple of holes where you want the wires to go through.  I did this as close to the beading as reasonably possible so that printed pattern lines weren't visible afterwards (I can't tell you how much I hate being able to see that sort of thing on a finished piece, it SO spoils it!)


When the holes are ready, poke the free ends of the wires through and pull them from the back so that the petal (or wing, or leaf etc) sits on the fabric.  Don't concern yourself with the angle it sits at just yet.


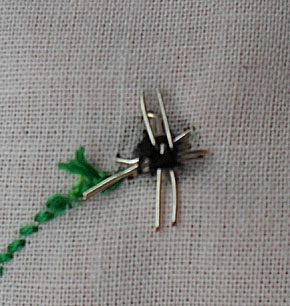
When all the detached elements are in place, turn the work over and pull them through as far as you can.  Then bend the wires to stop them from going back through again and trim off some of the excess using wire cutters or goldwork scissors (anything toughened, but NOT your regular embroidery pair!)


Using the black thread I still had attached from the beading, I secured the wires to the back of the fabric by weaving it around the wires and taking it through the back of whatever stitches I could.  Whatever you do, take care not to allow the securing stitching to show on the front (which is possibly what motivated DMC to suggest doing this before the beading, but you can see how easy it would be to attach beads through this lot, right?)  Trim the wires as much as you can, but leave enough to make sure they're secured.


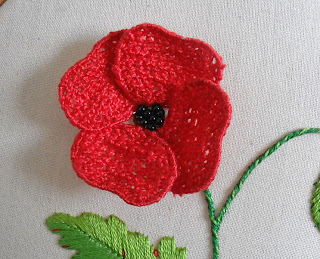
Turning back to the front and you can now arrange the petals in any way you like.  The wire bends easily, so it won't be too hard to have them at any angle you choose.


I hope that was helpful and that it's inspired you to have a go at wiring a flower or something similar. If you do, please leave me a link to see your work.  It's rather hard finding blogs of active stumpworkers!

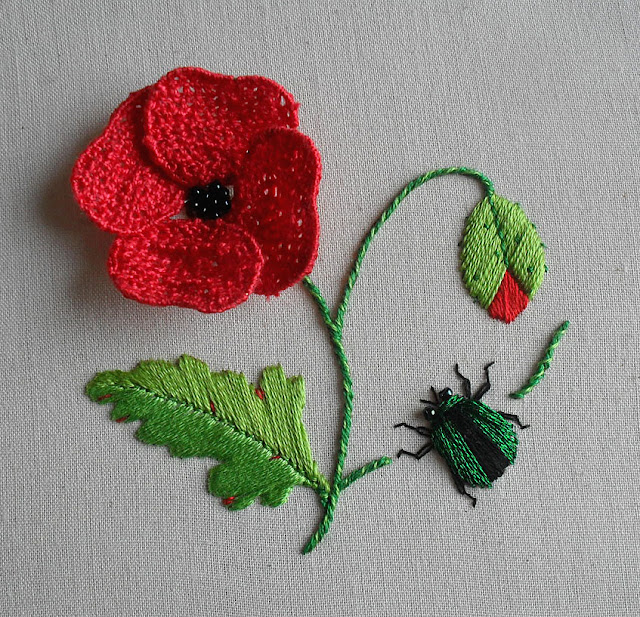
Here's the final piece, the bottom photo of which surprised and delighted me by remaining at number one on the Stitchin' Fingers content and photos leaderbeards for a couple of days!


I still have two more of these kits (see the 'Stumpwork page for the first two that I worked - 'Bee' and 'Ladybird'), which are 'Dragonfly' and 'Butterfly', so look out for those coming soon!

© Elizabeth Braun 2012

Monday 16 January 2012

Wired Needlelace Elements for Stumpwork

Whilst I was working the stumpwork poppy recently, I took some photos of the technique for one of the petals, which I thought may be of interest to anyone who wants to know how to create a wired element for a stumpwork piece using needlelace.  (There's a fabric based one too.)

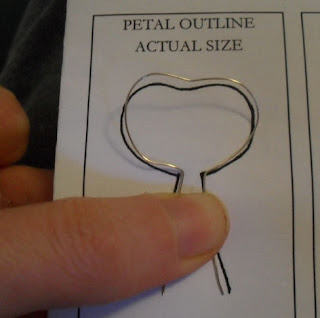
The first step is to create a wire outline for your selected shape.  In this case, I had the printed guide in the kit to help me, but you could also be working from something in a magazine, book or even your own drawing.  Naturally, it needs to be the exact size and you simply bend the wire to fit.  It doesn't have to be too exact a fit at this stage.  Stumpwork wire bends very easily too, so no special tools are needed.


The next stage is to couch the wire shape to a needlelace pad.  You make this pad yourself by folding a rectangular piece of fabric (here, lightweight calico is used) and tacking along the edge opposite the fold.  You will need two layers.  Couch the shape in place and at this point you will need to be as exact as you can manage in getting your shape correct.  It was easy for me at this point in the process as I could still see the impression of the shape from where I'd worked the first three petals.


Fasten on a length of thread by simply taking the needle under the couching stitches along one side of the shape.  Don't worry about any ends as they will be taken in later on.  Take the thread under the wire and into the shape and begin to fill in with your chosen stitch (in this case, detached buttonhole stitch) using the wire itself as the anchor for the first row.


Continue until the first row is done and, oh, don't pull these stitches too tight or work them too close together. When you get to the end of the row, take the needle back under the wire and then start the next row taking it over the wire back into the shape.


Anchor future rows onto existing stitches and keep on going until you run short on thread (or finish the shape, whichever is sooner!!).  It's good to use fairly long pieces of thread for this type of work, but that depends on how durable your thread is.  If you're working with a more delicate thread, such as silk or a metallic, then you'll need to take that into account.


When you come to the end of your piece of thread, anchor it off in much the same way you started the piece by running it under the couching stitches and along the stitches at the side of the shape.


Fasten on a new piece in the same way and continue working the filling stitch until you can't reasonably get any more stitches into it.


When your shape is full, then begin to work close buttonhole stitches all the way around the outside of the shape completely covering the wire and taking in any lose fastening on and off threads.  Fasten it off finally by hiding the thread as best you can among the stitches wherever there is a reasonable space that will not show.


Your shape is now complete, but still couched to the pad.  So, now snip away the tacking stitches holding the pad together and pull the two layers apart as much as you can to reveal the couching stitches between them.  Snip through some of these and pull them out.


Your shape should now come away cleanly in your hands and all you need do it pull out any odd couching threads (using a contrasting colour couching thread can make this much easier to do).


This method can be used with a variety of shapes as you can see here from a photo I took whilst working on the stumpwork bee wings a couple of years ago.  In this case, the filling stitch was working around in an almost complete oval along the wires and then just pulled together with a suitable stitch or two in the middle.


I hope this has given some insight into how these detached elements are made and has been helpful!  See the next post for how to assemble a wired flower!

© Elizabeth Braun 2012

Saturday 14 January 2012

TAST Week Two and so on...

If you were one of the many kind readers who enjoyed and commented nicely on the last TAST posting, then I'm afraid that today's may prove rather a disappointment as I've only done the doodle-pad this week.  So, to answer your question, Cynthia, no, I won't be doing a picture every week.  I'll just do them when I feel sufficiently inspired and I have the time and umph.=)  I do plan to do the stitches themselves each week, but will be happy with doing about half in some sort of pictorial form (which I plan to  make a sort of portfolio affair of, or may even mount some into cards etc).  At the moment, I have a number of gifts I want to make and other things to do, so I decided against the blanket stitch based picture.  To be honest, I wasn't really excited enough about it anyway, even though I found a good few variations, as you can see here.

So, here are samples of plain blanket stitch, double blanket stitch, knotted blanket stitch, what would have been a blanket stitch pinwheel had it not been worked on Aida and therefore turned into a blanket stitch diamond (which I liked a fair bit and felt had some potential in counted work), long and short blanket stitch and a raised blanket stitch bar, which was rather rushed off and so didn't really cover the threads it was stitched over very well.  Why blanket and not buttonhole?  Well, in the form buttonhole was introduced on Pintangle, it's exactly the same, but there is a traditional buttonhole stitch which is actually somewhat different, so I chose to be pedantic!!=)

One of the first of the other things I need to do stitch-wise is a 'thank you' card for friends who gave us a most unexpected gift the other day.  So, I fished out this old magazine freebie kit that I'd part-worked to finish off and got on with that a bit yesterday.  I also want to do a cross stitched bookmark for another friend and, after that, a nice cushion cover for the couple the card is for.  I'd planned something like that anyway and now I feel I have good impetus to do it.  I also want to get the dogrose made up into its final form and get that needlepoint giraffe sorted as well.  So, there are many projects clamouring for my attention and that means that it's not likely that TAST will be a major priority as far as really taking it as far as it goes each week goes.

And what do you think of these fellows?


These are for a magazine - 'Crazy Quilt Gatherings' Issue 4 - and the tutorial that was requested will be just for the central, larger red ladybird, but with instructions at the end for the other variations.  You can find out more about the mag and order a copy when I can find where the editor has hidden the info I got from her site before (LOL!!!), but I will be reserving rights to re-publish the tute on my blog, which I plan to do in the summer.  So, that's something coming up later on.

In the meantime, I have stacks of photos to chose and edit ready for that tute, plus one on general wired needlelace elements for stumpwork (yes, using a poppy petal from my recent project), then the assembling of the poppy itself along with the finished piece.  And that's before I even start on....

Yes, I'm feeling busy again!

© Elizabeth Braun 2012

Thursday 12 January 2012

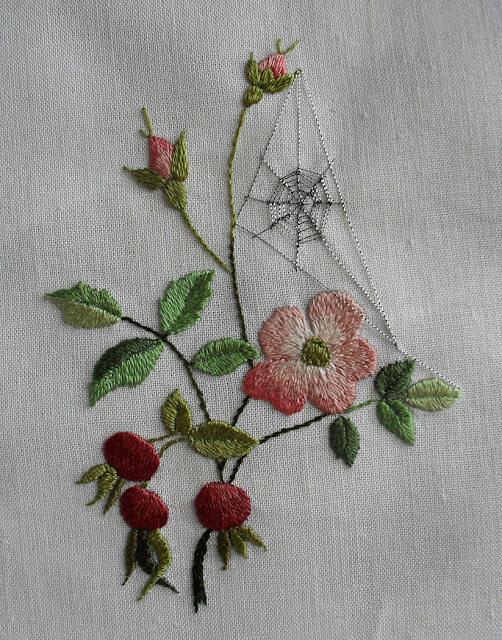
Yay! Completed needle painted dogroses

It took something to get me to get on with the side elevation rose on the back of this project (by which I mean it will be on the back of the manicure set, not that it's on the reverse of the main embroidery!!), and there have been a few false starts, but it's finally done.

I got stuck at this point pictured <- here for a while as I just could NOT get the last petal to look decent!  I tried it twice and pulled it out in exasperation.  You would have expected it to be the easiest, being more or less flat, but it was a real challenge to get a flat petal with no real colour change to look even passable!  In the end, I just did it - not exactly 'third time lucky' as I'm still far from content with it, and it'll have to do.

It got to this point and then I realised that the centre and the stamens really weren't the right shade of green and certainly didn't match the corresponding section on the front.  This second shade was much bluer than the very yellowey, browny green of the full flower centre and, as it was supposed to be all the same flower and  a matched set, I fished out the original colour and re-worked it in that.  This-> is the finished back of the piece.

Then it was on to the spider's web.  This was a bit challenging as there is a slight give in the fabric and, if I had it taut in a hoop, then when it was released, the long stitches in the web would certainly sag.  So, I put it in a snap frame and have it held firm, but not tight, then caught in the slack on the reverse for anything that hung a bit.  It looked at first like it went a little too far the other way now and seemed a bit too tight, but it ironed out just perfectly.  It's not needed for months yet, but I'm not keen to re-do parts - I have other projects planned!

The gauge of the Kreinik Cord can easily be seen here.  It's rather fine, isn't it?  I think it works perfectly here.  I didn't have the prescribed Madeira thread and hadn't access to any - and I didn't want to spend money on any more stuff when I surely had something perfectly adequate in my ridiculously large stash!!  So, it was good to finally have something to use the Kreiniks on as I stocked up on a goodly number of those a few years ago in about two thirds of the shades they do.  Time to try and use them more, methinks!

So, drum roll please - here's the finished thing:


Hope you've enjoyed the WIP discussion and like the finished embroidery and also that I can produce one or two in the months to come.=)

© Elizabeth Braun 2012

Tuesday 10 January 2012

The year that was and the year that will be (hopefully)!

I'm a good few days late with this, but I didn't feel like blogging much lately and, to be honest, I couldn't persuade myself to do a lot of stitching either after my stitch-and-blog fest in November!  Boom and bust, perhaps?  Well, one thing that I decided to do in future is to spread my posts out a bit when I'm on a stitching roll so that I can keep the blog going more when I'm going through a dry phase.=)

So, what did I achieve embroidery-wise during 2011?  Well, most importantly, I did a great deal better than the previous year when I had a record low of only 3 finishes!  This year witnessed 13 or 14 completions, a vast improvement!

Carried over from 2010, I finished off:
*The fish and waterviolets design from a Helen M Stevens book and made it into a scatter cushion.
*The goldwork viola, which is still waiting to have something final done with it; and
*The narrowboat cross stitch, which I hope to get framed at some point and hang in our living room.

Carried over from childhood (so UFOs for nearing 30 years!), I finished:
*Needlepoint giraffe, now waiting to be finished up into a cushion; and
*2 needlepoint birds, one which needed half the background completing whilst the other needed some repairs.

Started new and completed in 2011 were a number of smalls:
*2 cross stitched cards - one for DH's anniversary card and the other for a wedding;
*A cross stitched bookmark, which was finished up and given to Charlie;
*Hardanger card for a Chinese couple whose wedding I was a witness at;
*Ribbon embroidered gate and flower piece, mounted in a card
*A keyring for DH for said anniversary; and
*Silver and violet heart, mounted in a card for a 25th wedding.

Started, but not quite completed as of 31 December 2011:
*A dogrose needle painting, to be finished up into a manicure set holder; and
*A small stumpwork poppy and beetle from a deleted DMC kit.

And what of the year to come?  What's planned for 2012?

Well, first of all is, of course, to finish what's already been started, so:
*Dogrose needle painting and finish up
*Stumpwork poppy and beetle
*Make up giraffe cushion

Other than that, the big project of the year is to do as much of TAST 2012 as I can.  I made a good start with the week one stitch(es) and hope I can keep up both the getting it done the same week and being able to produce something pictorial with it.  The fact that there are others doing the challenge and trying to do roughly the same means that I have a 'group' to work with and lots of others' ideas to enjoy.

Something else that I have in mind (and which may even be done by the time this post goes live, as are 2 of the above listed projects!  Patience, patience....!!), is to do some stumpwork bugs which were requested for the 'Crazy Quilt Gatherings' magazine.  More on that soon...

I also want to work a few more pieces of stumpwork and some more needle paintings.  I got the 'Fresh Ideas For Beginners' book for our copper anniversary (12½ years - yes, really!), so I want to have a go at one or two of those projects, although the smaller pieces don't sit quite right with me.  It's hard to get a good design balance with just one bloom and I often feel that Trish's singles are a bit lop-sided, but I can soon change the layout.  I do need the practice with shading though.  I've also got a copy of Hazel Everett's goldwork book on the way....

So, it should be a productive year!  Let's see now....

© Elizabeth Braun 2012

Sunday 8 January 2012

TAST 2012 - Week One - Fly Stitch

When I saw the ideas and examples Sharon had put up for the first stitch of the TAST 2012 re-run, I was immediately inspired with plenty of ideas.  I also got out my two stitch guides and found enough variations to fuel the creative process further and, soon afterwards, came up with a design plan for my first TAST sampler. I know that most of the notes didn't show up well, so I must remember to use pencil in a better contrasting shade if I want everyone to be able to read what I've written!

Like Jules (whose wonderful dandelion seed head worked in fly stitch you absolutely MUST see!), I plan to do a doodle pad type stitch sample, then try to work it up into something pictorial.  I can't promise that I'll always manage the pic, but I can try and at least got off to a good start this week.

Here's the quick test run of the stitches to make sure I'd got them sorted worked with scrap ends of no.5 pearl cottons on a piece of rather stiff 14ct Aida (that there was no chance of my using for anything 'polished').  The first few are just plain fly stitches, then a few with longer tails, then a few twisted fly stitches.  The second row shows a rather open worked fly stitch leaf (which does not work well on Aida) and then two rows of fly stitch filling.  This is done by working a row of regular fly stitches with the tops of the Vs touching, then working the next row upside down with the bottoms of the Vs joining and the securing stitch being made over the pair of touching stitches.  This filling spoke 'fence' to me.

First I painted some habotai silk to give the relevant colours to the background.  I made the mistake of putting the whole thing rather too far to the right of the hoop.  It would have been better to have been more central.  Still, I soon realised both the error and that I couldn't really do anything about it, except to ditch that piece and start again, but although I found I had more habotai than I'd feared, I'm still not up for wastage.  It was good to try silk painting again, even though I found it a fair bit harder than I'd remembered.  Need more practice, I know and having more fabric than I thought means that I can try this kind of background again soon.=)

So, here's the finished fly stitch pictorial piece.  Most of the stitches are some form of fly stitch, except some stem stitch for the foreground roses and, of course, the ribbon work (although you can work fly stitch in narrow ribbon to good effect).  The peach flowers are just straight stitches in ribbons, and the roses are spider's web roses.  Let me know if you want to know how the latter are done as they're easy, quick and effective.  The grass tufts are individual twisted fly stitches and the rose leaves are worked in closed fly stitch.


On the whole I'm happy with the piece.  The bit I'd most like to change (and could have if I'd been up for a lot of un-picking and re-stitching) would be to work the fence in a narrower gauge of thread.  I feel it's far too prominent, although the basic idea etc is OK.  Even with that, I'm pleased with this first week's work as I've been able to use fabric colouring again, I've designed something completely from scratch with little more inspiration than the stitches themselves and I worked it completely freehand - no pattern transferred to the silk.  Oh yes, and I really know fly stitch and a few variations of it quite well now!!

What's that just about the roses?  Well, of course it's a FLY!=)

© Elizabeth Braun 2012

 
Google+