Showing posts with label Cards. Show all posts

Monday, 20 March 2017

Finishing up some older projects

I think many, if not most of us have some little itsy-bitsy things hanging around waiting for us to finish them, or finish them into something once the actual stitchery is complete.  I had a few of these and so, once all the wedding pieces were done, I had a bit of a finish-a-thon.

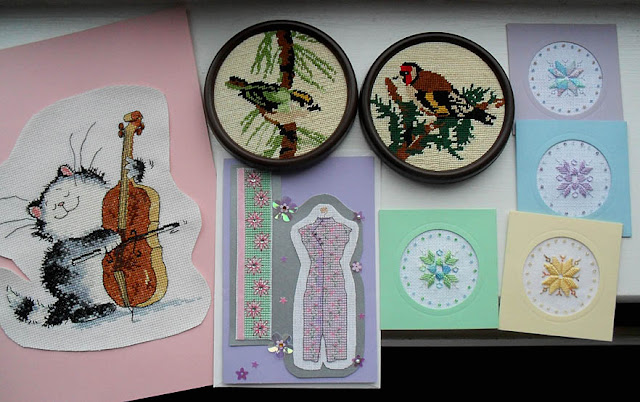
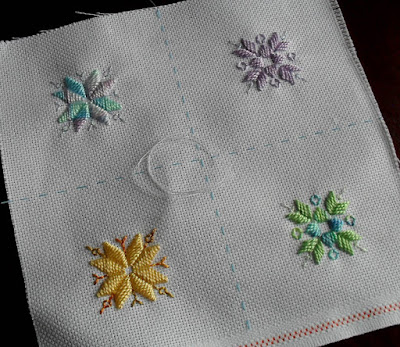
Long term readers may remember some, or even all of these pieces.  The first ones, the four tiny hardanger cards shown part worked here, I posted about around the turn of 15/16.  I had put the beading on sometime in the latter half of last year at some point when I actually wasn't in the depths of Intensive Project Hell, where I spent at least 3 months of 2016 (no wonder it was such a productive stitching year!), but I just hadn't mounted them into cards.


On one day, I mounted the four hardanger cards as well as the two old needlepoint birds in the frames that came in the kits, including giving them felt backings.

Mounting the other two cross stitches was quite easy using an iron as they're first put onto fusible webbing/Bondaweb, (which I had to buy a new supply of as I'd run out) but the paper not peeled off.  I then stuck them onto the relevant pieces of card, trimmed up the dress one and set the cat-a-cello (which my friend, Katy worked for me years ago) aside in a plastic pocket ready to go in the front of my long nelgected music folder.  I'm not exactly thrilled with the results of the dress card - it's too bitty and disjointed for my tastes, but I'm sure someone'll love it!

My project box was a great deal emptier for being able to move these eight items out!  There were nine things to be done at that point, the ninth being the lilac bellpull I shared a few weeks ago.

That's it for project catch up blog-a-thon - the series of almost 20 bi-weekly posts that have been needed to bring you up to date with my projects.  I hope you've enjoyed all these pieces. ☺. I can't promise such regular amounts of eye candy from here onwards, but there'll be things to see as I get pieces ready for this summer's show(s) and other things.  Let's see what we can come up with!

Text and images © Elizabeth Braun 2017

Friday, 17 March 2017

Lauren's Wedding Card etc

At the Knitting and Stitching Show, I had fun with a Rowandean 'make and take' piece again this year, having already decided to use it for a wedding card to go along with the dress panel and bellpull.

It was worked in about three sessions - two of them at the Show.  I did a bit, went off to look around again, then came back and did some more, then took it home to finish off.  Problem was that, as I'd left it in the hoop at the stand the first time I took a break, I forgot to take it out of the hoop when I was leaving the Show with it and, consequently, waltzed off with one of Katrina's hoops!  I realised what I'd done shortly afterwards and posted it back to her, so I hope she got it OK...

I didn't get any WIP shots this time, but here it is before and after the main fabric was trimmed to a heart shape and mounted onto a card.  As you can see, I chose a very different colour scheme from the last time I did one of these.


I love these little pieces and fully intend to do another one at this year's Show.

I needed to wrap the bellpull up somehow, but didn't want to roll it or risk it getting folded.  So, I cut a piece of purple card - the same cardstock as I'd used to mount the Rowandean piece on, and used that to support it.

The hanger hung comfortably over the back and I prepared and printed some care instructions to stick on the back of the cardboard too, so that the new owners know how to wash and iron it if ever needed, i.e.hand wash in cool water and press from the back onto a thick towel.

I found some terrific clear wrapping plastic at Wilko's instead of the usual patterned paper.


The last stage was to paint a plain, manilla A5 envelope with lilac metallic fabric paint (I don't have metallic regular stuff.  I don't paint much), put the card in that and then fasten them together with a little bit of double sided tape in between the two, and then attach this ribbon.

And that's the last of the African wedding series.  Hope you've enjoyed it.  It was nice doing three such very different pieces.  I felt I was able to give dear Lauren a little bit of everything. ♥☺♥

Text and images © Elizabeth Braun 2017
Saturday, 25 June 2016

Welsh Poppy revisited


As it's Sew in Love's eleventh blog-o-versary tomorrow, I thought I must mark occasion with a post!  What better thing to talk about than revisiting and improving a project from a couple of years ago that I wasn't very pleased with.

The problem with this one was the leaves, especially the darker one.  I just couldn't seem to get the shading right and it only looked decent upside down!!!  Also, it's a teeny bit puckered (a problem I constantly have with heavy embroideries, despite backing my fabric and making sure it's all held very taut in a hoop) I was wondering what to do with it as I didn't want to display it and it didn't seem to fit anything else.

Recently I needed a small piece to put into a baptism card and this one, turned on it's side so as to both fit better and to lead the eye more to the flower than it otherwise might have, met my needs about as perfectly as it could as long as you ignore the fact that the main stem shading is clearly upside down!!  The good thing is, by far the majority of people wouldn't notice that at all. =)

I'm almost out of white card blanks and I can't get any more as the company who made these seem to have long since disappeared from the marketplace, so I had to paint around the rim with white acrylic (not terribly well, I'm sorry to say....), in order to have a white 'mount' effect.  I liked it, just need to make sure and get it without any spills next time.

So, happy eleventh blog anniversary to Sew in Love and here's hoping that the next eleven go ever better!

Text and images © Elizabeth Braun 2016

Tuesday, 14 June 2016

Anniversary things finished

I had a feeling of déjà vu this anniversary.  Last year I didn't feel very satisfied with the things I'd made for Sir, and this year was pretty much the same.  He liked them well enough, so that's what really mattered, but I wish I'd done things just a little differently....

The Bible cover project was a bit of a bodged up job as, sadly, the textile I'd created here was too the tiniest bit too short and one of the four inner flap edges (two on each of the two flaps, of course), didn't catch in the main seam.  I had to sew it up by hand.  Also, some of the decorative seams are straining a bit and won't last well Having said that, he's pleased with it and he likes the fabrics and the gold zig-zagging.  I do too, I just wish the whole piece had been just half a centimetre or so 'taller' so that the seams wouldn't have failed and there would be just the tiniest bit of give in the length, thus avoiding some of the stretch.  Still, it was a first attempt at several things - creating this sort of fabric weaving effect, using metallics in the machine, making the cover at all and doing the fastening stuff.


For any future projects of this type, I'll be making the whole thing at least 1cm bigger than needed and I'll make a press-stud flap, or something similar, instead of trying to do Chinese knotwork with the most horribly springy elasticated cord.  Totally unsuitable for the job!  I need to look into some good alternatives.


The card wasn't too bad, but I wish I'd thought on to put a fancy paper shape under the stitching as I did the first time I did this kind of crafted XS card.  Need to remember that for next time too.  Lots of learning curves!!!  Not a bad thing on the whole, but I often wish I could learn in a 'safer' environment than to be always experimenting with new techniques on someone's gift.  So, I'm looking into courses again....


Again, I only used things that I had in stash for these projects with the exception of the elasticated cord, which I had to spend an extravagant 35p (US 50c) on!!!  I've recently used up quite a few things and run others down quite low.  I'm going to need some more Bondaweb soon, esp. if there are to be any more of this sort of project in the offing.

Coming up soon:  A new hardanger scatter cushion cover project and a small thread painting that I thought I'd never use mounted in a nice card.

Text and images © Elizabeth Braun 2016

Thursday, 10 December 2015

Rowandean piece complete!

This is how far I got on the lovely little Rowandean piece at the Knitting and Stitching Show.

The first thing I did once it was remounted in a hoop to work was to remove the yellow flowers on the far right as I felt it was going to end up looking far too 'stripey' if the colours just alternated.

The second photo is how far I got after the second working session having finished the main flowers and added in a few leafy/grassy sorts of motifs at the bottom.

Here's the final look of the piece with all embroidery completed.  I put in a couple of daisies as well as a few more green bits and white french knot flowers/berries.  Please don't ask me what they or any other stitches are supposed to represent as my knowledge of flowers and plant wildlife is nothing short of pitiful!

I could have brought all the threads I wanted to use to finish the piece with home from the Show, but I decided not to (except a piece of the light blue and lilac variegated one), and to use some of my own stuff instead.  So, I used 4 Coton à Broder #16s and 1 #25, plus some Kreinik gold cable to add in some more sparkle and highlights.  Delighted to have used 3 threads for the first time.=)

When it was all done and I'd even trimmed some of the organza edges, I mounted it in a card as you can see here, followed by a couple of angled close-up shots.  I was quite pleased with the final effect and I hope you like it too.


Text and images © Elizabeth Braun 2015

Sunday, 4 October 2015

Graduation card in cross stitch


Just a quickie today to share the cute owl card I made for my hubby who recently passed his PhD and, although he hasn't had his graduation ceremony as yet (January, we think), is now known as Dr Sir (aka Doc Martin!!)  He had his first piece of mail addressed to him as Dr the other day, which made us both chuckle.  It was from the Uni, of course.  He hasn't changed his title anywhere yet.  We're saving that for when we move and can take care of both changes in one go.

Anyway, hope you  like this wise owl (not that either of us is daft enough to believe that higher education gives wisdom!).  Sir took him to work and put him on his desk to show off.  Awww!  Even though his desk is in a corner and no-one really passes it, it was nice to do that anyway. =)

The fabric was stabilised by ironing Bondaweb to the back and then cutting the design out.  I've done that once before, but I think that either this type of fabric doesn't work too well with it - too soft, or I didn't remember how to do it properly.  I need to look at the book I got it from again next time I'm near the central library...

Text and images © Elizabeth Braun 2015

Thursday, 25 June 2015

Anniversary stitching


I haven't really been in any rush to share these photos as they're more a story of frustration and failure than anything else! =(

The meerkat bookmark was finished up as you can see here.  It looks OK and the tassel worked out - eventually, but I agree with Sir when he said that something is missing.  So, I plan to remove part of the backing sometime soon and add in some small 'landscape' features, such as a few tufts of grass etc.  Nothing much, just something to place our cute meerkat in context.


This is the second and larger catastrophe.  As you can see from the first picture, I had the nice tree design from the outline sticker all prepared to use as a pattern, complete with colours chosen etc.  Then I realised that there were three problems with this: 1) There would be a lot of work involved in getting it done on time and time wasn't something I had a lot of, 2) I didn't have a very clear idea of how to do certain parts of it, and 3) once the outlining was done (with couched Kreinik Cable abutted by this lovely multi-coloured Japanese couching thread in stem stitch), the colour scheme and whole look simply didn't work.  However, it was too much to take all the stem stitches out and doing so would probably have damaged the sheer fabric that I appliquéd to the main fabric into the bargain.

So, I had to change directions.  Thankfully, the 'Ultimate Cross Stitch - Oriental' that I'd ordered popped through the door at the right time and, in a section of small designs, I found something I could work into the card.  I erased the old pencil design OK and then used some Kreinik #8 fine braid in 027 (orange) and some Needle Necessities overdyed Kreinik #8 in a variegated light blue to do the water effects.

The whole thing doesn't 'go' terribly well and the koi carp design would have been better half an inch lower down, but it can't be helped now.  Anyway, it was done in time and that's more or less the only good thing I can say about it.  Oh well, it happens...

It's my tenth blogoversary tomorrow and  I'm just about to start work on a series of posts going over Sew in Love's 10 year history with highlights from each year.  Hope everyone'll enjoy that. =)

Text and images © Elizabeth Braun 2015

Monday, 2 June 2014

Needlequest - May round up and June design theme - line

Here we are just after the end of the fifth month of the Needlequest and it's time for a brief round up of what participants have posted about recently.

* I did a couple of learning samples, then the heart you can see here mounted into a card for Sir next Thursday.=)

* Tingting finished quite early on in the month and has completed a stalled project of 12 panels and made it up into a bell pull.

* Wendy also pulled out a project that had got stopped and got it re-started.  She hasn't finished it as yet, but here's today's update.

* Pamela managed to get quite a bit done on her coloured blackwork alphabet sampler.

* Like I usually am, Dorte's a little bit behind at the mo, but here's what she created for the April theme, Spring.

Some good stuff there, no?  I felt I really learned something over the last month too, which was great.=)

Now, it's already June and time to think about 'line' as a theme.  What does that mean?  Well, it's more about what it means to you than what it means to me, but the general idea is to spend some time concentrating on the linear aspect of design.  That could be outlining - even the popular 'doodle stitch' style, or it could be something verging on geometric.  It's really up to you!

I've inserted a couple of the sample project pieces I did when I was doing some City & Guilds work back in 2008/9.  These were from the 'line' design element part of the course.  As you can see, especially from this shell, we had to work only with lines as far as possible.  This one lent itself very well.


This second 'stitch and slash' piece (shown here before being 'distressed' (read: 'spoiled and made a mess of'!!!)) was based on the stripes on a tiger's coat.  So, linear in another sense.

What will I be doing?  Hopefully, finishing off the sample that was the second piece in my C&G course and something that long-term readers will be familiar with - the peacock feather.

I'm longing to get this one done and OFF my 'to do' list, where it's been for over 3 years!  I don't need it for anything, but I hate UFOs and there's always a chance I may go back to C&G one day, so the more I have in my portfolio, the better.  Also, if I dump it now, I waste all that time and effort (many hours worth, I can assure you!), and waste is something I was brought up to loathe!

So, t'must be finished.=)  I also would like to take it to the Harrogate Show in November and show my old teacher as she's usually there now promoting her C&G micro centre, Castle Textile Group.

What about you?  What do you have in mind, Team NQ members?

I'd also be interested in hearing from those who signed up, but haven't made a start on the challenge yet.  It's not a problem, of course.  The whole thing is optional and I, like many others, have signed up for several challenges I never did a thing about!!!  I've made some changes to the participants list though so that the active ones appear first.

For more information or to sign up to join in, go to the Needlequest challenge page.

Text and images © Elizabeth Braun 2014

Wednesday, 10 April 2013

A sympathy card


My sister-in-law's father died from lung cancer recently, so I put together a small card for her.  Above you can see the materials including the design transferred onto white silk and mounted into the working hoop, and below you can see the Anchor pattern I took the design from.  It was originally a wedding ring cushion!


Below is the finished item (I took no WIP photos this time as it was a quick piece) with a few extras added in to 'pad it out' and the ribbon attached as well.


I'm part way through the last of my DMC stumpwork kits and will report on that soon.

Text and images © Elizabeth Braun 2013

Sunday, 3 March 2013

A ribbon card to share

A few years ago, in a fit of needing retail therapy whilst I was unhappy in a former job, I went to the Crafty Ribbons site and bought a few of their cut price, end of range kits, some of which I've already featured on blog. This was the last remaining one and the design left me feeling that I could really understand why it had been discontinued.  For one, the design isn't that exciting, but that's nothing compared to the poor choice of background colour - dark green and purple on black!  How they sold any is beyond me, but I got one and tried to make some improvements. 

Naturally, the very first thing was to dump the black background.  This is both an easy thing to do and made necessary by the fact that they always seemed to give you the very smallest scrap of fabric possible to work on - the sort of size you can't fit into a suitable hoop without troublesome mounting with other fabrics etc.  So, that's easy to lose.  I had another go at painting a background for it.  The first time I tried, I did the greens in too 'yellow' a tone and so the rather blue-ish colours went poorly with it.  This time I made sure the tones were all relatively blue themselves, even though they faded a lot more than I expected (again!) by the time they'd dried.

I also jigged around a tiny bit with the design, but I don't think I made any real improvements there, especially as I'm no expert in ribbon work and really only know one or two basic concepts.  What do you think of the finished item anyway?


I like this sideways on view as the light has captured the sparkly elements of the organza ribbon nicely, which is a photographic treat as one normally doesn't get to see such detail.


I've already got the next small stumpwork piece prepared in the hoop for embroidery, so look out for that starting soon!

Text and images © Elizabeth Braun 2013

Monday, 15 October 2012

A Little Ribbon Embroidery

I've had a couple of Crafty Ribbons kits in my kit drawer for a while now and have been meaning to get them worked up.  However, when looking at the designs, I couldn't help but feel that the best hadn't been made of its potential.  This is the 'original', what do you think?  You get a small square of black fabric to work it on and, yes, it's plenty big enough for the design, but really nothing like big enough to put in a hoop.  In fact, although this is my fourth kit of this brand, I've never once used the fabric supplied in the package owing to its over small size.

I decided that the first thing to do was to create a new background and, as I had three small projects in mind that I wanted non-plain backgrounds for (including another kit by CR, the colour choices for which make me wonder how they could bring themselves to put it into production....), I decided to have a go at a bit of painting.  Below are the materials I thought I'd use, meaning to do natural, landscapey sorts of things with them.


And below again are the materials I actually used!!


This is what the piece of fabric with the three painted sections looked like when wet.  Notice that I wet the whole area I wanted to paint first so that the colours merged and spread out well on the fabric. 


And this is what it looked like dry - considerably lighter.  As you can see from the tubes of paint photo, I've used watercolours and I really should have remembered how much lighter they dry.  Having said that, I didn't really mind the change too much as I've made the mistake of having an over-poweringly painted background before.  I also learned that Sap Green' dries with quite a hard edge (as does Permanent Rose to a degree) - something to look out for another time.


The middle of the three was the one intended for this ribbon piece as I wanted to give the impression of a pot of flowers in a yard with a wall/fence (the brown-ish colour) and some greenery (the green spots dropped into the brown whilst still wet), on a paved area (the grey at the bottom).

The embroidery itself took around an hour and, as it was done in evening light and was a quick stitch, there are no WIP photos this time, but here's the finished piece, mounted in a card and looking a lot nicer, I think!


Do you agree?  I do like the general design and love the plant pot button - in fact I'm planning to get hold of a few, probably from the Crafty Ribbons booth at the Harrogate Knitting and Stitching Show, presuming they'll be there.  So that part was good, but I think the black background, to say nothing of the awful slightly blurred and totally 'flat' photograph on the kit was a big no-no.  Not surprisingly, I got this as part of a sale on their website - discontinued kits.

PS, In case anyone's wondering what's planned for the other two painted backgrounds, the simple answer is nothing.  I found the green on the left hand one just too vibrant and felt it didn't go with the ribbon piece I had in mind and the right hand idea just no longer works for me.  I was going to do a small sampler with a crazy quilt appearance as a support for my catch-up on TAST.  I still quite like the idea, but don't think this one worked and so will consider trying another one soon.

Text and images © Elizabeth Braun 2012

Friday, 21 September 2012

Hardanger Floral Card

No WIP Wednesday posting this week or last owing to having nothing to post thanks to being away a couple of times.  However, I've been getting on with my knitting - only need to sew it all together now, and made this floral hardanger card:


It's from a New Stitches magazine, issue 88 from summer 2000 and I bought the materials pack, which included pearl and stranded cottons and the card blanks (there's also a blue one, but I worked that one years ago.)


Here's the finished thing, although, as ever, I had trouble getting the light pink of the card to show and couldn't make satisfactory adjustments on the image editing software, so you'll just have to imagine the card - including the bit showing through the cutwork - to be just that bit brighter than you can see here.


The close-up looks quite nice, and the peachy-pink of the background shows up passably well.

Until next time....

Text and images © Elizabeth Braun 2012

Friday, 10 August 2012

Cushions and Cards

I may not have posted much of late, but I have been busy!  First of all I finished up the Ring of Roses scatter cushion cover by putting the zip in.  Here it is being modelled by one of our own cushions.


Then I moved on to the giraffe cushion cover.  The patchwork went relatively well, but is still a bit uneven.  This was the front when initially put together - showing off some wonders in uneven patching!!


Frankly, I prefer the back and wouldn't be at all surprised (or upset) if the recipient decided to display it this way around!


In the end I managed to find a way to improve the look of the front - put some trim around the main picture and extend it a little so as to cover over the worst of the bad joins.  It's come out OK, but it isn't exactly a masterpiece.  Mercifully, the disabled girl I'm giving it to has rotten eyesight, so she won't see it's many imperfections!!!


Then it was onto the next project - a cross stitched wedding card for a couple who are marrying on 31st of this month.  They're having tea and cakes as a simple reception afterwards, so I thought this display of colourful cupcakes was in keeping with the occasion.  It may be a simple and fairly small design, but just look at all the colours I needed!


This shows the cross stitching itself finished and the colours out for the outlining.  I decided not to use the prescribed dark grey for it, but to chose a darker shade of each colour family used for the icing (I tried to make every single cake a different colour and almost succeeded too!) and a brown shade for the cake bottoms.  The Kreinik is for the cake stand.


I think it turned out quite well, don't you?

Here are two books I borrowed from the library last week.  The hardanger one is mostly stuff I already know, but there are one or two ideas in there that I haven't come across before, including using beads in filling stitches.


Also, how about these for hardanger cards?  Creative, or what!  It made me feel that there was a great deal more to be done with a simple piece of hardanger than just to mount it in an aperture card.  I got some white card blanks yesterday to try painting up as three of these seem to have been.


I was also inspired by the cross stitch cards book.  Again, I've discovered that there's so much more that you can do with a small cross stitch than just bung it in an aperture card, so inspired by some of the designs in the book and using the technique explained there (putting bondaweb on the back of the Aida to 'stabilise' it, but not needing to bond the second side of it to anything - just cut out the shape, peel off the backing and then attach to your card), I made this with the 'cat in a basket' design I finished off a few months ago.


The cross stitched piece was attached using those glue pads you get for decoupage types of crafts and thus gives a bit of a raised look.  Of course, you can do it flat as well.


It feels good to have got a few projects finally completed and also to have some new and innovative ideas for fairly simple techniques.  I can develop quite a bit just with these counted thread pieces and am even considering trying to sell some of the hardanger ones, once I get something impressive stitched up.

What's next?  Finishing up the other WIPs, I hope!  I'm having a really good deck clear at the moment, trying to get long neglected tasks done and free my mind of all that clutter.  Next sewing machine job will be making some alterations and then I can get down to my camera case that I've been planning for over 3 years now....

Text and images © Elizabeth Braun 2012

 
Google+