Showing posts with label Working Methods. Show all posts

Friday, 15 July 2016

Where Bloggers Create Party 2016 - Welcome!

Welcome!

Welcome both to the Where Bloggers Create Party 2016 (the annual link party where numerous creative bloggers give you a virtual tour of their workspaces and stash stores), and also to my 'compact and bijoux' (anyone else remember that ad??) little home and workspace!

I don't have a studio to work in.  Since we moved back to Leeds in February of this year, I don't even have my own room anymore (this is where I used to work).  Thankfully, I decluttered an enormous amount of surplus belongings, especially books, so we were able to fit into this new home.  (If anyone's interested in my on-going downscaling of stuff, see my lifestyle and goals blog.)

The room I work in is a 3-in-1 of lounge, dining room and my study.  Here you can see my desk area.  Let's zoom in for a close up or two....

At the back of the desk I have this little, untreated wooden drawer set from Ikea.  One of those things that I always meant to 'pretty up' and never got around to doing.  On top is a reading lamp, a pot of Derwent Pastel Pencils, my computer glasses, lens cleaner, needlecase and snips, and a cute cupcake pincushion a new friend made for me.  There's a six section pencil holder next to it with a variety of art pencils and Cotman watercolours (which I wish I could say I used regularly) and other assorted bumf.  Then comes a Chinese dictionary I need whilst studying, a couple of diaries and my coaster.

Want to see inside the drawer set?  Of course you do!  Well, I would if I were in your room.... :)


The top left two drawers are just gadgets, cables and admin things, then we have pencils, highlighters, pens, tape, staplers, fixative and paper stationery as well as a quantity of language learning flashcards.  I have a load more elsewhere.  Too darned many!  Another thing I need to reduce...

On the right hand side of the desk is this Really Useful Box organiser shelf doo-dah, with an extra nine RUBs on top.  Here I store spools of metallic thread (mostly Kreinik), packs of needlework beads (mostly Mill Hill), sewing threads and notions, ribbons, buttons and some spools of rayon machine embroidery thread.

Next to that is my writing pen pot.  As you can see, I like to use lots of different colours when studying, working, planning....

Under my desk I keep various bags and an old thread storage container thingy (not shown), and this bag of hoops and frames.  Next to it is my folder of art papers and card, there's a roll of silk fabrics (protected with brown paper) behind it and another roll of completed needlework that needs mounting or otherwise housing.


Why am I showing you the dining table?  Well, this foreground chair is where I sit, not only to eat, but also to use the sewing machine, which you may be able to see on the floor against the far wall, bottom right.

I love miniatures, but haven't room for a dollshouse, so I have some displays that I alternate every so often.  This one is my favourite and I plan to make a little scatter cushion for this lovely chaise longue at some point and perhaps a hardanger runner for the sideboard.

I keep meaning to start making and selling miniature embroideries and textiles.  One day.  Maybe?  Who knows? No-one seems to do miniature hardanger, so I could try that.

I don't really want a whole house actually.  If I had one it would mean more stuff, more collecting, more this, more that.  I'm a minimalist at heart, but it's hard to be one full on when you're into textiles!

Let's move on to the arts and crafts storage around the room and first up are my thread and fabric drawers, with another thread box (holding all my regular Anchor and DMC stranded cottons, plus all my Anchor #8 and #12 pearl cottons) on the left and the shelves on the right holding four files of magazines and other patterns (down from eight, yay!) and, below the crockery shelf, my needlework books, also reduced in number.


Here are all the treasures in the wooden effect threadbox:


Seriously, they are my treasures!  I could part with pretty much everything else I own without much sorrow, but I would be really quite grieved to lose my needlework and art stash!


Along the shelves is some space for my box of Pipers Silks, some more art stuff and one of the boxes holds greetings card blanks.  The brown box has other card making supplies in.

Downstairs in our entrance storage area I keep my main box of paints and regular pastels (i.e. not in pencil form) and a box of fabric and silk paints.  They're kept here for three reasons: 1) They're away from the heating radiators and less likely to dry up; 2) There really isn't room for them upstairs, unless I start loading up the top of the bookshelves (too cluttered - stressful working environment!); and 3) I rarely use them and don't need them close to hand.  It's not far to go if I need them any time.


Back upstairs in the main room again and it's time for a tour of the fabric and thread drawers:

The top of the bottom section holds all my counted thread work fabrics, all in bags according to type and with a label on showing how much I have of each colour and count etc.

There are also plain weave white, cream and black fabrics in this drawer.

Drawer two holds all the pretty coloured fabrics, most of which are fat quarters (silks towards the front of the row), and patchwork rolls.  I don't do a lot of patchwork, but am getting a bit into using them for other things.  To be honest, I'm really trying to run the contents of this series of drawers down as I've accumulated a lot of fabric and need no more for a l-o-n-g time!

Drawer number three doesn't have much in the way of regular fabric in, although it does have 'helper' fabrics like interfacing, Bondaweb, Romeo soluble fabric etc.

There are also back ups of oft used threads (some of which are not so oft used and need to be e-bayed...), some dress patterns, cotton molds and about half a dozen embroidery kits, which I also want to use up and sell on as far as I can.

Drawer four, below, contains mostly fabric offcuts bought during my time in Taiwan a few years ago, including the plain, shiny fabrics you see here.  (I also got all the patchwork rolls out there.)  The other piece are fancy fabrics made in Yorkshire in one of the last remaining mills (at the time).  My father used to have a 2nd/3rd floor (depending on how you count floors) workshop above the mill and sometimes got hold of offcuts for me to play with when I was about 11 or 12 years old.  I still have some of them and keep trying to think of a use for them.  Any ideas??  The mill has now been converted into homes, as have many in the area.


Onto more of my favourite art and crafts supplies - embroidery thread!  This smaller four drawer set contains:


Drawer one:  DMC Coton à Broder in 4 weights, DMC Light Effects, some skeins of Anchor metallics, organza ribbons, Superstitch 'invisible' thread (mostly used by my hubby to cut cake layers when he makes a Black Forest Gateau!!) and some oddments of Kreinik metallics from a couple of their 'Scrap Bags'.


Drawer two is mostly overdyed cotton threads - Gentle Arts Sampler Threads (GAST), Weeks Dye Works (WDW) and a few Six Strand Sweets (SSS - RIP!!) at the front, Anchor multi-colours and variegateds, some DMC Colour Variations, some Caron Collection threads and the entire 24 skein set of DMC linens, which I collected, but haven't used yet (and have since been pulled from their range) at the back of the drawer.

Drawer three is Anchor Coton à Broder # 25 at the front, #16 in the middle and #5 pearl cotton at the back.


Finally, drawer number four holds the whole set of Madeira stranded silks on the left and the whole range of Anchor Marlitt rayons on the right.


Sometimes I work sitting on the sofa behind my desk and other times I work at my desk with my fancy, professional set up - balancing my common or garden embroidery hoop between the desk edge and my belly!!! There are advantages to being out of shape, I tell you! Saves me a packet in specialist equipment, especially as I like to rotate my work regularly (haven't mastered the trick of stitching in any direction) which would be a nuisance in a fixed work frame.

So that's it - tour complete!  As you can see, my workspace is very functional and simple.  I'm not into a lot of display items as I like to keep things as clear as I can under the circumstances and I find extra items cluttering and stressful.  I prefer to work in a 'sense of creative calm', as Canadian minimalism YouTuber, Lia, so beautifully put it.  I'm hoping to clear it up yet more in time, especially by completing some of the half worked projects and other tasks that show in some of the photos above. :)

I hope you've enjoyed your visit.  Please leave a comment and say, "Hi", especially if this is your first visit here.  I've been blogging for just over eleven years now, so there's plenty to see in the archives and pages (tabs below the header photos above).  There a number of ways to follow including using the e-mail subscription widget in the sidebar or one of the reader 'add to' buttons.

Thanks for calling in and hope you'll visit again soon.

Where Bloggers Create is being hosted by Karen of My Desert Cottage.  If you haven't come from my link on her blog, please click over to visit some of the other studios and workspaces hosting an open house this weekend.

Text and images © Elizabeth Braun 2016

Monday, 23 May 2016

Designing and preparing to stitch a souvenir wedding pillow

If you've been following me on Instagram, you'll have seen this whole project through to completion, but, as it was a rush job, I didn't have time to blog it until now.  IG is great as a whole post can be done in just one or two minutes, although the picture quality often isn't so good and the editing features are limited.

Less yadder, more project.

An old chum is getting married down in London next weekend and I wanted to make him a little something to mark his big day.  I usually ask my friend(s) whether they would like a ring cushion, a wedding sampler sort of thing or something for their home (usually a scatter cushion cover).  I had an idea of a sort of sampler for this couple as the groom's mum had told me that they already had a ring cushion, so I asked her to run it past them.  I got a very useful design brief in return, that they'd like a wedding souvenir cushion, even if only a small one, with white roses, their initials and the date on, and could they have a sprig of lavender too?

I used the open rose and rosebud from Trish Burr's 'Long and Short Stitch Embroidery - A Collection of Flowers' and remembered that there was a lavender piece in 'The A-Z of Thread Painting'.  I traced them, scanned the tracings, resized them and printed them out along with some letters and numbers using a nice font in MS Word (here showing the 28 05 bit accidentally printed out in italic!!)  Each element was cut out and tried in various combinations in a square outline.

Then it was time to move on to colour selection.  I love this part of the process as I adore colour and getting just the right shade is important to me.  Here you can see me with my Anchor colour chart, bags of DMC stranded and a white rosebud photo on my tablet to help me adapt the pinks from the book designs to the needed white (which is to be their main wedding flower).  You can also see my new work area in this shot.


The next stage was to decide which colour was to go where on the thread painted elements, so I made some more copies of the flowers and planned out the shadings.

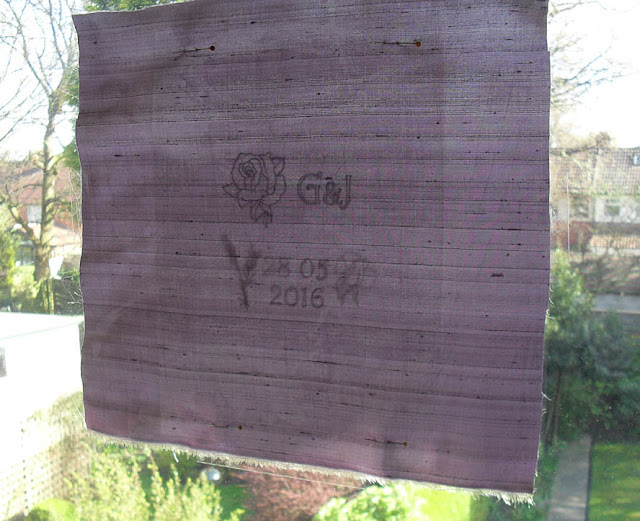
Following on from that was the tracing of the design onto this lovely lilac and light brown shot silk.

As you can see, I have zero fancy equipment.  Apart from the fact that I have no room to store it, I resent spending money on a specialist item when things that I already have to hand will do just as well.  I frequently use a window as a light box.  In this case, I pinned the tracing (which I'd made good and dark) to the back of the fabric, then taped the whole thing to the window so that it didn't slip during the process.  The pattern was drawn on the fabric using a 0.3mm black biro that I got in Taiwan.


Once the fabric was in the hoop and ready to start stitching, I began to feel that, not only was stranded cotton a little 'large' for the size of the design (the whole thing would be a square with 7"/22cm sides), but that I wanted more sheen.  So, the choice was clear - switch to Piper's Silks.  Each strand is about the same gauge as one of sewing cotton, so about half that of a strand of regular embroidery floss.


I have over 500 shades of stranded cotton, and only 117 of Piper's Silk, so I found my colour choices a little more limited, but, as usual, this only seemed to matter when it came to greens and neutrals.  Funny how other colours can seem to substitute for near shades quite well, but greens, browns and greys always have to be right.  I have 50% again as many greens as most other shades, but still had to make do somewhat.  I nearly ordered some more, but remembered my crafts No Buy in time!!!  I'd also have had to buy more storage for them, which wouldn't have been good.  I also could foresee a saving in stitching time as there's only one 'white' in Piper's, but two in Anchor!!

Next post on this project will show the working of the lavender and the rose greenery.  Hope you like the look of this piece so far! =)

Text and images © Elizabeth Braun 2016

Friday, 21 August 2015

Progressing with the 'Painted Ladies' piece

Hello everyone!  A special, warm welcome to anyone visiting from the Inspirations Magazine newsletter!  I'm delighted to have been featured there this morning. 
=)  

It's been rather difficult to keep up with blogging of late for a few reasons, but mostly because I'm still dealing with headaches which either start with or are made worse by wearing the glasses I need in order to be able to deal with photos and blog posts.  I'm braving it today though lest new visitors think Sew in Love is one of the (sadly) many dormant blogs, and also to bring you up to speed on how one of my current projects is going.

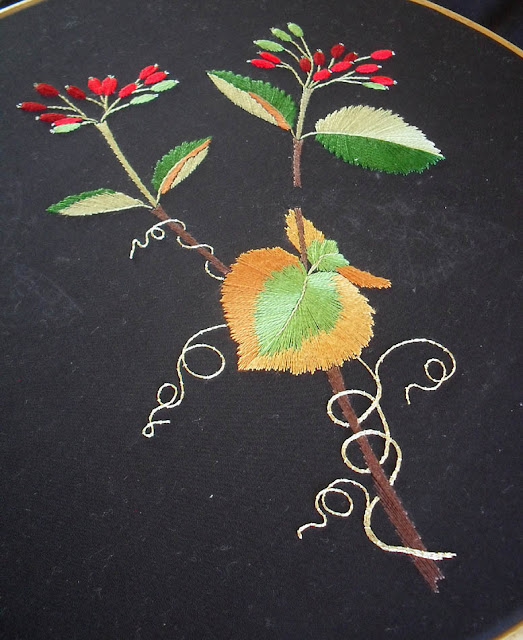
Here you can see how far I've now got on the Helen M Stevens' 'Painted Ladies' piece from her book 'Embroidered Butterflies'.  I started it last September and it's got stalled and neglected many times.  I love her work, but I find it rather hard to emulate.  Anyone else feel the same?

This second photo was the last shot I posted of this piece a few months ago and it got stuck there for quite some time after my having done that big, double-coloured leaf you see in the foreground.

Actually, I was finding the snake stitch needed for the thicker stems rather hard to do, so I shied off for a while - as is my wont.  I really have to stop doing that - allowing projects to get stalled for so long because I'm scared of a certain part!

Anyway, I had a go and it seemed to go OK.


Then it was onto the pinky-brown stems and the curling tendrils, which were working by couching Kreinik Very Fine Braid 102C in single, double and even triple rows down with their 102C Cord.

The short straight stitches at the tips of the berries were also worked in Kreinik Cord, this time 087C.

The stranded cottons used so far have been from DMC (the greens and brown) and Anchor (the oranges and reds).
The next stage is another one that fills me with dread and that I feel inclined to delay indefinitely and that's the butterflies.  Getting all those little, bitty areas worked all in the same radial directions and without being able to use guidelines like I could in the leaves (it would clutter up the outline just too much) is frankly scary.  Also, the tracing is disappearing and needs retouching.  Not easy.  However, as I want to enter it in the Sheffield Fayre next weekend, I need to get on with it, and that right quickly!

I've also been working a whole new cross stitch piece for the Fayre and I'll show you that soon.

Text and images © Elizabeth Braun 2015

Monday, 14 July 2014

Where Bloggers Create Link Party Post

Where Bloggers Create
Karen of My Desert Cottage has been running a blogging party where creative bloggers are invited to create a photo post featuring their own creative space, big or small.  I'm late joining in this event as I only found out about it yesterday and couldn't put together a post (my second today - wow!) until this evening.  However, you can see all the lovely links and Karen's own studio post here.

There are some amazing work spaces featured, including large rooms holding a stunning amount of stash with many non-working surfaces displaying a huge collection of decorative knick-knacks and curios.  Some of these studios are works of art in themselves!  Having said that, I'm grateful that I don't have the dusting of some of them and I wouldn't like to have to pack the contents of them for a house move!!!=)  LOL!

Anyway, even though long time readers have seen my room and desk space before, there are always new readers who may be curious.  Also, one of my reasons for joining in this is to show that, whilst big and beautiful rooms are a joy to work in and to have a good look at, they aren't strictly necessary for creating works of art.=)

We live in a medium sized flat (apartment), which is the biggest we've ever had, but still nowhere near big enough for me to have a double-bedroom sized room for myself.  Sir has one, but I'm still in the queue for a good sized area, where I can even leave the sewing machine out etc etc.  Much of my stitching actually takes place in our living room, in this corner of the sofa.  The white scatter cushion actually on the seat is there to even up the height and stop me getting sciatica, as, like pretty much all our furniture, the sofa is worn out and needs replacing!!  This workbox lives in a discreet corner just inside the dining room end of our main room.  I keep my main collection of plain/solid colours in this, such as stranded cottons, coton à broder, perle cotton etc.


Moving on to my own tiny room now.  The room is 1.9m x 2.1m, which is around 6 feet, so it really is small.  This is the view from the entrance.  I can't say 'the view from the door' as we had to take the door off as it was inward opening and you could barely turn around in there!  So, we replaced it with an old curtain from our previous home.  It gives a little privacy and helps keep the heat in when I have the fan heater on during winter days.


Virtually every space is taken up, so I wouldn't have room for any more souvenirs than the postcards and bookmarks you can see decorating the back wall.  Sorry, it isn't very tidy at the mo!!

This is a closer view of the shelf area:


And here's a shot of the plastic drawer towers, which are, of course, one small set on top of one large.  To the left of the larger drawers is a basket bag full of hoops, plastic snap frames (Q-snaps and R&R Frames) and things like that.


Anyone interested in seeing the contents of these drawers may like to visit this old room reorganization post where I give a bit of a tour of things like that.  They haven't changed a great deal.

The last shot is the lower part of my main bookshelves where I keep all my stitching books and magazines as well as some art pads and books and so on.


The 'Butterflies' books on the left hand side of the floor is to go back to the library this week and the 'Little Flowers' one is my latest acquisition when I won Mary Corbet's giveaway (I'm still stunned about that one!!)  It's on the floor as yet as I don't actually have any shelf space for it just now.  In her 'And the winner is post', Mary mentioned that I wasn't one to arbitrarily add new titles to my embroidery book collection, well this is one of the three reasons why.  (The others are lack of funds (almost all my recent buys have come mostly from cashing in Nectar points on e-bay!) and a decision only to buy what I think there's a real chance I'll use!!!)  My last buy (Jane Nicholas' 'Stumpwork Butterflies and Moths') is sitting, out of view in this shot, above the Chinese dictionaries you can see top left as I haven't room for that either!!  I need a bit of a clear out....

So, those are my creative spaces.  One is just a corner of the living room and the other, the tiny box room that most people probably just cram their junk into.  Hope it's been of interest and maybe even inspiration to some.=)

Text and images © Elizabeth Braun 2014

Saturday, 22 February 2014

'Welsh Poppy' finally complete!

A mere three weeks after the needle painting part of the Needlequest finished, I finally completed my second small piece!  I had to force myself to get on with it - I don't much like doing the leaves in so many shades, but I'm glad I did and it's now finished.=)  I'm now back to my preferred two WIPs.  I don't like to have more than that as it makes me feel stressed and leads to over slow progress and/or certain things being plain neglected whilst I do the easier one(s)!

Here are full frontal and side views.

Working these two pieces was quite a steep learning curve.  Although I'd done some of this type of work before, I still felt I was learning a lot, and quite intensively too.  I'm more or less happy with the flower on this piece, except that I keep on making my first row of stitches too wide and end up leaving little room for the denser shades of the colour later on (note to remember next time!),  but the leaves - esp. the small one - leave something to be desired.  Sir said that the large one was well done and, yes, that's not too bad, but we both agreed that the small one was, well, naff!!=)  The bud comes close to suiting that title as well, esp. in this next shot where its deficiencies are highlighted!!LOL!


I've come to the conclusion that I prefer leaves to have less shading in them.  There were meant to be five shades in the large leaf.  I narrowed it down to four.  There are only four yellows in the petals and I can't help feeling a bit that, if the leaves are so super-shaded, it may detract a little from the flower.  This is something I need to think about and plan much more carefully next time.

Another aspect that needs more thought in advance is colour choice.  It was OK sorting out the petals for both my recent pieces, but greens are another pair of pyjamas altogether!  It seems that you never can have enough greens and I'm considering doing some serious research into plugging some gaps in the Anchor colour range with DMC shades.  Working out which shades are needed is going to be a real headache as I only have the Anchor colour chart and lighting in shops isn't the most helpful.  If anyone has any suggestions (I'll also post to Stitchin' Fingers and HEN about it), I'll be happy to have them.  The main problem with this one was that two of the shades of green seem to have got reversed in the book instructions and, as I was also using conversions from DMC to Anchor, I was tired and stressed by the time I'd finally fiddled out a combo that would pass muster.  Not ideal, but it'd do.  I'd already worked two sections and had to unpick them, so I wasn't out to create yet more work!!  So, shade selection needs a lot more careful work in future, and that before I start to stitch.  With days getting longer now, that will be easier to fit in.


This is kind of an odd angle to take a photo from, but I like it!  The badly done bits are played down and the light falls just on the part where contrast with the fabric is lowest and so shows it off in, literally, its best light.=)

So, yes, I'll be coming back to needle painting in the not too distant future - there are five more pieces I want to do from this book, but with extra care in colour choice and leaf working.  I'll be visiting the bricks and mortar Sew and So shop in a few week's time, so I'm saving to get the DMC shades I need then.  Hope their in-shop prices are as good as their on-line ones!  Anyone know?

So, now I need to get back to poor Hanako who has been neglected this week.  I'd like to finish the February challenge on time as there's nothing worse than always trying to catch up all the time.  The key, I think, is the same as it was when working the weekly samples for the City & Guilds level 3 course I started a few years ago - small and/or simple!  As one of the upper year students said to me, "I soon learned to keep things small."  One to bear in mind when choosing my Needlequest pieces, methinks!  What say you?

Text and images © Elizabeth Braun 2014

Friday, 1 February 2013

January 2013 Progress Report

So, how did I get on with working on my stitching goals last month?  Not quite as well as I'd hoped as I had wanted to finish both the rabbit and the peacock feather and neither are anything like complete yet.=(  Still, I did work on both and the sampler as well.

Embroidery

Finish any current WIPs

* 'Sunshine and Flowers' sampler  about 40% complete from 35% at the beginning of the month  That's OK as this is a big project and, whilst I would have like to have got further along with it, here are beginning and end of the month progress photos to compare:


* Stumpwork rabbit  about 45% complete Again, progressed from about 35% complete and here are the comparison pictures:


* Peacock feather  about 50% done only did one piece of thread on this, not worth photo recapping!!

The next section has been changed a little from the original.  I've added 2 more kits that didn't sell on e-bay sales (hardly surprising as the photos on the kits are AWFUL!), but that I think I'll do after all and changed the overall goal to 8 in the year instead of so many from this section and so many from that.  Less bitty and more room for choice this way.

New projects - aim to complete at least 8 of the following throughout the year

Kits in stock: 

* 'The Farewell' blackwork
* 'The Embroideress' blackwork
* Ribbon embroidery
* Coleshill stumpwork butterfly
* Anchor stumpwork face card
* DMC stumpwork butterfly
* DMC stumpwork dragonfly
* Pearsall's stumpwork poppy
* Liina tablemat
* Design Perfection Red Admiral
* Crown cross stitch (Sir's 14th anniv card??)
* Shoe cross stitch/craft card

Book/magazine projects:

* Tudor Lady cross stitch
* Medieval Lady cross stitch
* Helen M Stevens' butterflies piece (cushion for Lindleys)
* Goldwork insects from the Hazel Everett book

Own Ideas:

* Work from the C&G Level 1 Hand Embroidery syllabus
* " Goldwork syllabus (perhaps with insects as above)
* " Stumpwork syllabus
* TAST design challenges

I'm not starting any of these until at least one WIP is finished!

Sewing I also haven't done any of, but I did delete one project I thought it unlikely I'd get to.

Sewing

* Trial some fancy purses
* Find a use for old bedding - even if I don't do it yet!!
* Camera Case
* Try some dolls house textiles
* Mending and altering

Knitting

* Salmon pink baby jumper  59% complete  from only 5% complete on 1 Jan when I'd just done the back rib and a tiny bit of pattern.  I was delighted to find another ball of the yarn the other day, so I can get on with this one and have a finish that I'm proud of instead of just 'it's OK, I suppose!'
* Chunky jumper for me
* Learn cabling
I'm having some trouble with the other two as the chunky pattern I bought doesn't seem to be for chunky wool at all, but for super chunky, although the needles specified don't match for either weight of yarn.  A bit confusing and also disappointing as I had a specific chunky yarn in mind.  I don't feel experienced enough to adapt the pattern yet.  I haven't had the nerve to start in on the cabling book I borrowed from the library either!  I used to think knitting was such a simple thing...

General

* Be Creative Every Day (challenge page here)  31/365 so far so good!
* Join in 'Art Every Day Month' challenge in November - work the 8 techniques book

Goals for February

* Finish the rabbit
* Finish the feather
* Finish the peach baby knit
* Try some of the cabling pattern samples in the book
* Try some miniature bedding ideas now I've got some fabrics for them
* Get to '50% complete' level on sampler
* Make a start on one or two projects from the embroidery list - when first two on this list are done!
* Continue CED challenge
* Report back on 1 March and continue to post regularly in the meantime - 12 posts in January, which isn't half bad!

What have you done this last month??

Text and images © Elizabeth Braun 2013

Tuesday, 1 January 2013

2012 Accomplishments and 2013 Goals

Well, here we are in another year already!  Time today to do the usual review of the previous year's accomplishments - in the textiles field, anyway.=)

This is the needlework part of the goals list I've had posted on my Fluffy Little Idiot blog since March 2011 (it was an almost 2 year list).  The projects I finished off in 2011 I've greyed out so it's easier to distinguish which relate to this year just finished.  I've also removed the strikethrough on 2012 completed projects for those who would find that hard to read.=)

Here goes:

Finish all needlework WIPs, including long-term ones and stuff that I'm dragging my heels on:
*1 Water violets cushion cover  Done!
*2 Goldwork viola  Done!
*3 Rose's dogrose manicure pouch  Done!
*4 Narrowboat cross stitch  Done!
*5 Giraffe needlepoint  Done!  Stitchery was finished in 2011, but the cushion was made up in 2012
*6 Birds needlepointDone! 
*7 Cat in basket cross stitch UFO  Done!  
*8 Peacock feather sample from C&G days  50% done - ready to restart in WIPW

New Projects
*9 Mum's Cross'N'Patch garden sampler  maybe 35% or so done 
*10 Make keyring for Martin for 12th anniversary Done!
*11 Stitch stumpwork bunny  35% complete - shading restarted and going well=)
*12 Gifts (2 - 1 tie, 1 card) Martin for 13th anniversary  Done!
*13 25th wedding card for Milnes'  Done!
*14 Card for Howletts' Golden Wedding  Done, although a pastel painted one.
*15 Bookmark for Silvia  Done!
*16 Something for the Lindleys - cushion  Not yet started, on 2013 list
*17 DMC Dragonfly stumpwork kit  Not yet started, on 2013 list
*18 DMC Butterfly stumpwork kit  Not yet started, on 2013 list
*19 Rolled Rose Brazilian embroidery kit (17/11)  Done!
*20 Do most TAST 2012 stitch 'doodles'  Done!  (I did 30 of the 48, which is 62.5% = 'most') 
*21 Make up my camera case  Not yet started, on 2013 list
*22 Hardanger cushion cover & card for Caleb's wedding (17/8) present  Done!
*23 Card for Kirstin's wedding (31/8)  Done!
*24 Ribbon embroidery card for Tingles' new home  Done and got a tute out of it
*25 Hardanger card for Charles' 5th wedding  Done!

Also stitched were a stumpwork poppy and beetle piece out of which I got three tutorials (although I confess to having started this one the previous year), and a collection of stumpwork bugs - variations on a theme - that was also done as a tute.

So, 6 cards in 4 different techniques - cross stitch, hardanger, drawn thread and ribbon embroidery, 5 practical items - 2 cushions, a manicure set, a tie and a bookmark, two pictures and a bunch of TAST samples.  In addition to that, I also knitted a white baby layette with red and green embroidered trims, a light green baby cardy and matching mittens and a light yellow baby cardy, both of which latter need buttons that I hope to get tomorrow, and an external hard-drive cover.  I'm content with that - up to 20 items in total.

What about this coming year?  Here's the 2013 Goals List needlework section:

Embroidery

Finish any current WIPs:

* 'Sunshine and Flowers' sampler  about 35% complete
* Stumpwork rabbit  about 35% complete
* Peacock feather  about 50% done

New projects - Work at least 6 of these 10 kits: 

* 'The Farewell' blackwork
* 'The Embroideress' blackwork
* Ribbon embroidery
* Coleshill stumpwork butterfly
* Anchor stumpwork face card
* DMC stumpwork butterfly
* DMC stumpwork dragonfly
* Liina tablemat
* Crown cross stitch (Sir's 14th anniv card)
* Shoe cross stitch/craft card

Book/magazine projects (aim to complete 2):

* Tudor Lady cross stitch
* Medieval Lady cross stitch
* Helen M Stevens' butterflies piece (cushion for Lindleys)

Sewing

* Red skirt
* Skirt with patchwork panels
* Trial some fancy purses
* Find a use for old bedding
* Camera Case
* Try some dolls house textiles

Knitting

* Salmon Pink baby jumper  5% complete
* Chunky jumper for me
* Learn cabling

There are no item numbers this time as I don't have '100 things to do' list this year - although I could easily make it up to that!  As you can see, I've also added in progress so far and am planning to get the feather and rabbit pieces done this month. I had wanted to complete them last month, but two very heavy colds in a row reduced my working ability somewhat!!  You can see the WIP status tomorrow in the first Work in Progress Wednesday of the year.  I'll also be able to show off the knitted pieces in this week's Sunday Yarn.

What about you?  Have you set out your goals for the year already?

Text and images © Elizabeth Braun 2013

 
Google+