Showing posts with label TP3. Show all posts

Monday, 6 June 2016

Wedding pillow - lettering and finishing up

The final stages of the project coming up today! I managed to transfer some of my mobile phone photos over to the laptop too, so have included one of those shots here as well - one of me working on the lettering!! =)  As you can see, I have an incredibly high-tech, fancy, professional set-up - balancing my plain old embroidery hoop on the edge of my desk!!!

I was working on a lilac and light cappuccino shot silk fabric and so I chose a light gold thread to stand out well against the mid-toned background.  I tried a few metallic shades against it, but this was the one that really stood out - Kreinik Very Fine Braid in 102C couched down with coordinating Kreinik Cord in 102.


This third photo really shows the sheen on the flowers and also the good contrast of the pale gold.

I had originally planned to work the letters and numbers in a sort of solid method, probably by couching in rows, but owing to time limitations and, if I'm totally honest, complete lack of confidence in being able to pull off my first idea (and no time to trial it), made me think that outlining would be best.  I owe that idea to Amber of Ambrosia Stitches who, when I asked for ideas on Instagram, asked me if I was going to outline or fill the shapes, thus planting the idea of simplifying in my mind.


Here's the completed embroidery in the hoop before I removed and trimmed it for finishing.  As you can see, there were two lots of different light when I took these photos as they were done at different times of day and also in two opposite windows.  I've yet to work out the best lighting in our new home!!

Below you can see the completed pillow.  Sadly, I didn't get a very good full frontal shot of it as there was too much light bleaching out one side (as you can see a little here too), and I couldn't wait for a better time as I was about to hand it over!!


The finishing process was fairly simple.  After pressing the backing fabric and as much of the piece as I could (I was most disappointed to see I'd failed to avoid puckering....), I trimmed the surplus fabric away from the work and placed a line of tacking style stitches along the line I'd marked on the front when first transferring the design.  Then I placed the right sides together with a small piece of cotton based fabric (a reject square from one of the baby quilts!!) in between and tacked to the backing to protect both the stitching and the cream backing silk from getting scuffed on the metal work stitches.  They were tacked just next to the marking stitches, leaving the bottom open except for a centimetre or so each side of the corners.  I machine stitched just inside the marking stitches, trimmed off the corner excess and pressed back the edges of the open side.  After removing the tacking and marking stitches and putting some toy stuffing in to make a proper little cushion shape, I slip stitched the bottom edge closed.  Done!


I was delighted to hear that the bridal pair were thrilled with it and this photo was kindly sent by the groom's mum the day before the wedding.

You can also get some idea of the size from this shot too.  It's only a 7"/18cm sided square, so only a souvenir size.

Glad to have a big project done and so it's on to anniversary things for Sir and also making things for the two or three shows I hope to enter this summer.  More on all of those soon.

Text and images © Elizabeth Braun 2016

Wednesday, 1 June 2016

Wedding pillow - white roses

Part three of the wedding pillow.  Today let's look at the roses.

I didn't seem to take many WIP photos with my digital camera, but there are plenty on my Instagram stream, if anyone would like to see more.  @sew_in_love_blog

Instagram is great and easy to use.  All you need is a simple smart phone to set it up, then you can also follow your selected accounts on a computer if you want to.  Quite a number of needlework bloggers already have accounts and we often post there well before blogging as it's so quick to do, whereas a blog posting can take quite a lot of writing and tweaking.  I didn't have time to stop and blog during this project, but a quick shot on my phone camera and upload to IG meant that followers were able to track my progress in real time.  It was quite fun!!!

I've now filled in the Pipers Silk colours for the rest of the project on the previous post and the white rose petals were worked in White, Ecru, Pale Mushroom, Pale Sycamore, Sycamore, Lime Yellow and Bright Lime, with some tiny stitches in China Pink at the base of the rosebud.

This last one shows some of the sheen nicely, although it isn't the sharpest of photos.

Next time I'll share the lettering and the finishing up into a small cushion/pillow.

Text and images © Elizabeth Braun 2016

Thursday, 26 May 2016

Wedding pillow - stitching the lavender and greenery

Part two of the wedding pillow piece coming up......

I decided to start with the sprig of lavender as I thought it would be the most bitty and also, in a way, the most challenging to stitch.  The rest would be needle-stroke heavy (i.e. time consuming), but this was the part I was most uncertain of.

I started with the blue and purple flower section and used the A-Z book I mentioned last time and my own colour plan as guides.  Working to a smaller scale, I had to simplify somewhat, but it worked out ok in one shade of purply blue: Flax Blue, two bluey purples: Pansy and Pale Pansy, and one light, reddish purple: Crocus.

The greenery was worked in two shades of green: Pastel Green and Peppermint, and a tiny bit of brown: Mid Brown was added at the bottom.
The next part was the rosebud and I went for the sepals and stem before the petal section.

Greens were a bit of a problem as, whilst I have more greens than any other single colour in my Pipers Silks box, there are still nowhere near enough to get the shades right.  There are only about 21 greens as opposed to about 80 in my stranded cotton collection!  As far as I can discern now (I neglected to take colour notes at the time), I used seven shades: Leaf, Pale Leaf, Fir Green, Dark Green, Pale Olive, Muscat and Bronze Gold

These green parts were a lot trickier and more time consuming than I'd expected, especially with the tiny touches of Dark Terracotta and Dark Cerise around the edges which, if I'd honest, hid a multitude of uneven edges!!

It was much the same story with the open rose greenery.  I did the stem first and then completely forgot the thread-painting rule of working back to front and did the sepals before the leaves.  I think I was on a 'finish with this colour' role and just forgot how important it is to observe that working method if you don't want problems with abutting edges later on.

Would you believe that the lower leaf here took two hours to work?  TWO HOURS!!

In this photo you can see how incongruous some of the greens really are - especially the stems. =(  It didn't look too bad as a whole, but the rose greens are really too lurid to be realistic.  I was very tempted to order some more shades, but not only did I remember that I am NOT buying any more threads - 1632 is more than enough - but also that I was working under time pressure and couldn't really wait several days for the order to arrive, so I escaped an illicit thread splurge!


Here's the whole piece as I ended it that day having made a small start on the back petals of the rosebud.  More on the roses next week and on my baby projects over the weekend.

Text and images © Elizabeth Braun 2016

Monday, 23 May 2016

Designing and preparing to stitch a souvenir wedding pillow

If you've been following me on Instagram, you'll have seen this whole project through to completion, but, as it was a rush job, I didn't have time to blog it until now.  IG is great as a whole post can be done in just one or two minutes, although the picture quality often isn't so good and the editing features are limited.

Less yadder, more project.

An old chum is getting married down in London next weekend and I wanted to make him a little something to mark his big day.  I usually ask my friend(s) whether they would like a ring cushion, a wedding sampler sort of thing or something for their home (usually a scatter cushion cover).  I had an idea of a sort of sampler for this couple as the groom's mum had told me that they already had a ring cushion, so I asked her to run it past them.  I got a very useful design brief in return, that they'd like a wedding souvenir cushion, even if only a small one, with white roses, their initials and the date on, and could they have a sprig of lavender too?

I used the open rose and rosebud from Trish Burr's 'Long and Short Stitch Embroidery - A Collection of Flowers' and remembered that there was a lavender piece in 'The A-Z of Thread Painting'.  I traced them, scanned the tracings, resized them and printed them out along with some letters and numbers using a nice font in MS Word (here showing the 28 05 bit accidentally printed out in italic!!)  Each element was cut out and tried in various combinations in a square outline.

Then it was time to move on to colour selection.  I love this part of the process as I adore colour and getting just the right shade is important to me.  Here you can see me with my Anchor colour chart, bags of DMC stranded and a white rosebud photo on my tablet to help me adapt the pinks from the book designs to the needed white (which is to be their main wedding flower).  You can also see my new work area in this shot.


The next stage was to decide which colour was to go where on the thread painted elements, so I made some more copies of the flowers and planned out the shadings.

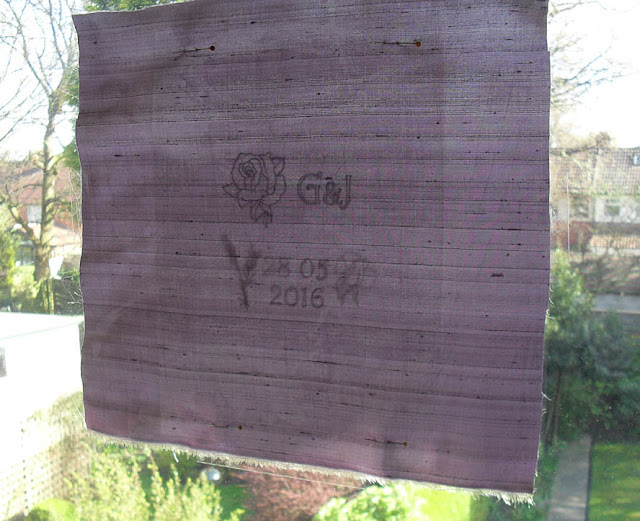
Following on from that was the tracing of the design onto this lovely lilac and light brown shot silk.

As you can see, I have zero fancy equipment.  Apart from the fact that I have no room to store it, I resent spending money on a specialist item when things that I already have to hand will do just as well.  I frequently use a window as a light box.  In this case, I pinned the tracing (which I'd made good and dark) to the back of the fabric, then taped the whole thing to the window so that it didn't slip during the process.  The pattern was drawn on the fabric using a 0.3mm black biro that I got in Taiwan.


Once the fabric was in the hoop and ready to start stitching, I began to feel that, not only was stranded cotton a little 'large' for the size of the design (the whole thing would be a square with 7"/22cm sides), but that I wanted more sheen.  So, the choice was clear - switch to Piper's Silks.  Each strand is about the same gauge as one of sewing cotton, so about half that of a strand of regular embroidery floss.


I have over 500 shades of stranded cotton, and only 117 of Piper's Silk, so I found my colour choices a little more limited, but, as usual, this only seemed to matter when it came to greens and neutrals.  Funny how other colours can seem to substitute for near shades quite well, but greens, browns and greys always have to be right.  I have 50% again as many greens as most other shades, but still had to make do somewhat.  I nearly ordered some more, but remembered my crafts No Buy in time!!!  I'd also have had to buy more storage for them, which wouldn't have been good.  I also could foresee a saving in stitching time as there's only one 'white' in Piper's, but two in Anchor!!

Next post on this project will show the working of the lavender and the rose greenery.  Hope you like the look of this piece so far! =)

Text and images © Elizabeth Braun 2016

 
Google+