Showing posts with label WIP. Show all posts

Wednesday, 24 February 2021

Work in Progress Wednesdays - 24 February 2021


Anyone who knows much about my embroidery work knows I love hardanger.  It's quite quick, it looks great and is deceptively simple to work.  So, when I saw this kit going on LoveCrafts.com, I instantly fell for it and bought it with my anniversary money last summer.

At first I thought I'd make the square mat up as a dining table centre or something like that, but it really didn't feel right.  So, I decided to omit the edging and make it up as a scatter cushion cover for the sofa, even though it will work out as a rather larger one than I'm used to having.

Naturally, starting out with the white diamonds and the linking segments, then moving on to the coloured work in cross and back stitching.

Below is all the surface work completed.  As you may be able to see, I changed some of the colours in the cross stitch.  I didn't really like the blues in and around the flowers, so replaced them with pale yellow and a light yellow-lime.


Beginning with the cutting and removing of the threads.  I know a lot of stitchers find the very idea of this part quite unnerving, but I'm OK with it.  You just have to bear in mind the traditional carpenters' saying: 'Measure twice, cut once'.  In this case, count twice, cut once.  It really helps to avoid mistakes if you double check at every stage of a counted thread project - especially when it comes to things that would be hard to hide, like taking out one thread too many!  It's possible, but I don't recommend it. ;)

More on this one soon.

Again, just over four years since the last Work in Progress Wednesdays post!  I can't promise them weekly from hereon in, but it may be possible, even if I don't fancy doing a full blown multi-photo post, to do a brief one with one image from the Blogger app.  It's quite basic, but will allow for that nicely.

Text and images © Elizabeth Braun 2021

Friday, 10 March 2017

VS Renaissance Rose Bellpull - bullions!


I mentioned in my last posting on this project that I'm often wary of bullion knots.  I think that, with a combination of Kathy's extremely helpful, 'alternative' method of working them (compare how the needle is held in this, more traditional approach, which I find overly awkward to work and leads to puckering)and the sheer quantity of knots that I had to work on my one and only piece of Brazilian embroidery and the 'Sunshine and Flowers' sampler, I've managed to get a fair grip on how to get them to work out OK.  I was really quite pleased with how the majority of these came out.

Having said that, I still wouldn't call myself confident with them, but I'm certainly getting there. ☺  I need to try the same do it over and over again method with cast on stitches and flowers next as I'd love to master those.

You may have noticed especially in the big heart, but also in the other two, smaller motifs with the bullion roses, that there were some pink lazy daisy stitches to insert too, which also add variety and balance to the piece.  Having said 'balance', I realised, looking at this photo, that the roses are much more numerous on one side than the other, but oddly, I didn't notice when looking straight at it.  Maybe this angle of photo has highlighted it.


This is the last section, (which I actually did first) and you can also see that I also worked the outer border as far as I could ready to make the piece up into a bellpull.  The original design was to be framed, so I had to think carefully about how to go about it.  More on that in the next in this series.

Text and images © Elizabeth Braun 2017

Monday, 6 March 2017

VS Renaissance Rose Bellpull - part one

Thanks SO much for all the kind compliments on the last finish - and also all the way through the project.  And now, welcome to a new project series!

Before she approached me about her wedding dress panel, Lauren said she and her fiancé would like a bellpull with a favourite Bible text for their home as their wedding gift.  I chose the absolutely gorgeous Renaissance Rose design from Victoria Sampler to adapt for this piece.

Here's the initial floss toss and, with the exception of deciding against the gold shades in favour of the aubergine cord, this is pretty much what I used - for a wonder!  I normally chop and change several times during the process.  Do you?  Or do you stick fairly closely to the pattern and/or original palette?

As you can see, I opted for 8 shades of Coton à Broder #25 from DMC and Anchor.  The fabric is 28ct congress cloth (I think) in an ecru shade with which I used Anchor Pearl Cottons #8 and #12 in shade 926.


A quick comparison with the chart photo shows that I needed to start out with a little adaptation of the original design in order to meet the requirements.  I decided to replace several pattern rows in the middle, including the 'For You' bit with the scripture they wanted and also to move a cross stitch floral line down to make the text section framed by a similar motif.  It took a couple of goes with a piece of graph paper to get the lettering charted correctly, but it wasn't too big a challenge - especially not after the last project!


After the middle section was complete, I filled in the surface work on the lower half, including the beaded parts, (using good old Mill Hill petite seed beads, which I'm a big fan of), but not the bullion knots which I'm always a little wary of and decided to leave until last.  I hadn't ever thought of doing it before, but I love the section of ecru four-sided stitch in the section above the hardanger heart.  I think it adds a great textural element.


Next came the top few motifs, including the leaf and bead 'frame' for the lovely heart motif.

I then did the cutwork section on the lower heart, as you can see below and even remembered to take some photos at this point.  I didn't take as many WIP shots as I would have liked of thie piece and some were too poor to do anything with other than to delete them!

Here's the piece at the point that we'll leave it for this post and next time I'll show you the bullion knot sections.

I loved this project and I'd really like to do another one, perhaps on bright white fabric and with yellow flowers.  I would very probably want to keep that, but it would be a strong candidate for exhibiting in the summer shows.

Text and images © Elizabeth Braun 2017

Monday, 27 February 2017

Wedding Dress Modesty Panel - final preparation stages

Here we are arrived at part six of the dress panel project - the penultimate instalment.

And. This. Part. Was. Scary.

Actually, the part that worried me most was, after removing the embroidery hoop, I needed to trim the excess stabilizer off and I was scared I would cut the net.  One misplaced snip and the whole thing could fray irretrievably.  Thankfully, that didn't happen and here you see it soaking in our bathroom washbasin.  After which, it came out just that little bit crumpled up.


It dried quite a bit flatter though. Phew!  It was mostly the silver threads twisting and turning.

I re-rinsed the piece to make sure that all the stabilizer was out of the net and the threads - the silk felt horrid whilst still full of half dissolved Romeo!  Once it had dried again and I'd finger flattened a fair number of the silver threads, I subjected it to the book treatment overnight as you can see here.

From the bottom up:
-Thick or well folded towel(s)
-Beaded piece upside down so that the beads and stitchery sink into the towel and don't get flattened themselves and ruin the piece
-Heavy books

You can also use this sort of method to iron beaded pieces (or those using thick threads and 3D stitches) and/or clothes.  Iron from the back onto a thick layer of towelling and you'll have a lovely result.  Here's the finish I got.  Not 100% straight, but more than straight enough and much better than the wet version above!


Here's the panel mounted on a piece of dark green A4 card and popped into a plastic pocket for protection on the next part of its adventure - flying over to Ghana.

This is where I bow out of this project and, next time, you can see Janet, the bride's mum, fitting the panel and some shots of the whole dress in action. ♥

Text and images © Elizabeth Braun 2017

Friday, 24 February 2017

Wedding Dress Modesty Panel - Beading and Embellishing

Part five today - the beads and jewel embellishments.

I'd never used pearl beads of this size before, or diamond-like sparklies either, so I wasn't really sure of myself here.

This first shot you might remember from the introductory post in this project series - it's from the dress proper and shows what sort of jewel trims it had, including the pearl beads in the small flowers and leaves.  Actually, I forgot to put them above the leaves in the end....  Just remembered that whilst writing this!

Here's the whole panel with the pearl beads added.

And a close up of my favourite section with just the beads on.

The dress proper had two different sizes of pearl beads, whereas I was working with just one, so I ended up adding more in later on to even things up a little in the central, large flower.


These are the sparklies I was given to work with from both top and bottom.  I'd never really seen anything like this before, especially not with a view to working with them.  As you can see, the back has an 'x' shaped finish and no visible attaching mechanism like beads have.  So, what I ended up doing was fastening the jewel to the embroidery by catching threads around the arms that hold the stone in the setting.  That worked very well

Finally for today we have a few shots of the final panel with the addition of the sparklies.  I loved these.  They ended up being realy quite easy to do and they just look great!  I was happy to add the leftovers to my stash. ☺  Wish I could think of something else to use them on now.  Couture 'commissions' aren't something I get every day, sadly!  Part of me rather likes the idea of working as an embroiderer in a big fashion house.


Here's the whole panel still in the hoop, just before being taken out and prepared for fitting.  More on that next time, on Monday.  Join me then! ☺♥

Text and images © Elizabeth Braun 2017

Wednesday, 22 February 2017

Wedding Dress Modesty Panel - More details on the silver work

Today I'm here with an extra instalment insterted in the dress panel story.  After the last post on the silver threads, Dima from the D1-D2 blog (go and check out her progress on the Alison Cole 'Pearl Butterfly' project, BTW.  It's beautiful!) left a comment asking how I dealt with the thread ends on the back of the panel.

Well, that made me realise that what I'd declared to be 'pretty self explanatory' was really nothing of the sort and that she probably wasn't the only one who was disappointed by my lack of detail.  I plead the excuse of having almost 20 blog posts to write in only 3 or 4 sessions and being a little too eager to get them all done and scheduled.... (blush).  Here I am today to redress the balance and explain how the silver threads were attached and fastened off at the back.  I found a few helpful 'in progress' photos too. ☺

Basically, once I'd gone around the four larger flower motifs, (which were easy to deal with given the heavy embroidery I could fasten off to at the back), there were two ways of dealing with the long stems and smaller motifs: with two pieces of thread running largely in parallel, or with one doubled over the whole length.

These first three photos show part of the process of working a two parallel lengths section.  What that means is that I cut two lengths of Kreinik Japan #7, not necessarily to the same lengths, and worked them alongside each other part of the way, separating for the single lines around any motifs that fell into their paths.

I started by plunging both ends under a large motif where they could be fastened off easily on the back, then couched them down with one stitch across both threads until it was time to diverge them to outline small flower and leaf motifs.


In this third shot you can see the two ends re-converging ready to be couched back down in the original one stitch way and then plunged under the big flower and fastened off there.  I had to use my tweezers quite a lot to help the thread to settle in the right direction.


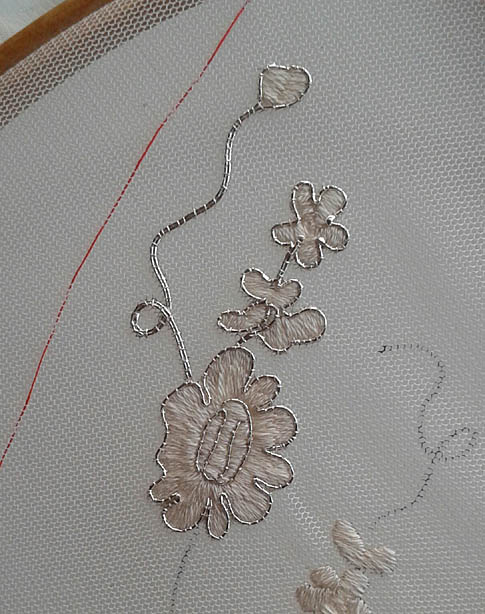
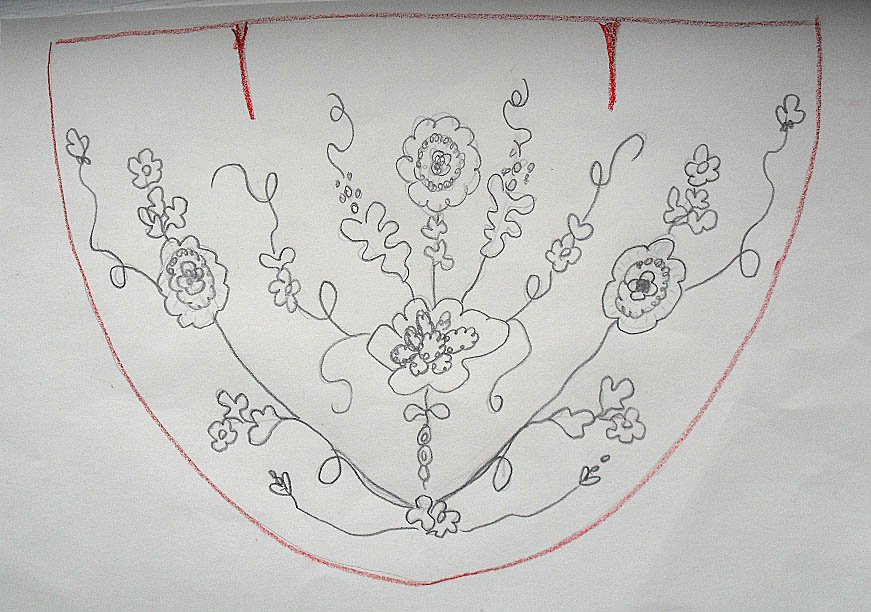
As you can see from this section, it wasn't always a simple task.  The long diagonal stem, with the motifs under it AND the stem with the heart, the flower it joins into on the right and the snaky-shaped trailing stem end underneath that flower are all one section!  The piece for the lower part needed to be quite a bit longer than the top one as it had to cater for the triple flower and leaf section.

Actually, I can't remember exactly where this piece ends, but it looks like the trailing end was worked with one piece laid double and then continuing out to the heart stem.  I'm thinking the ends are safely couched under either the heart or the flower.  I can't recall at this distance of time - I did this back in November!  It may even have been at the base of the snaky trailing bit, where it joins the flower.  I've no pictures of the back of the work, so I can't check now.

The other way of working the silver outlining was to use one long piece doubled over.  These two segments here were done with this method.

The thread was bent in either half, or as near to half as the diverging motifs allowed and started at an edge on the motif furthest out from the large flower.  On each of these, I probably (or should have!!!) started near the base of the leaf or flower, worked all around it, then begun the one stitch over two threads method until I was able to plunge the ends under a larger motif again.

Basically the same thing applied when working something with a trailing end of stem as in the two sections seen below.  With these, I 'tweezed' the Japan thread closely together and, after putting in one securing stitch over the very end of the fold, set off with the over-two couching stitches.  The right hand motif was done by bending one piece roughly in half, whilst the left hand design needed a rather longer 'lower' part so as to take in the other trailing stem - again worked by doubling up.


I hope that makes some sense at least!  I was flummoxed by some sections and had to think about the best way to do them so as to neither leave any ends showing through the net, nor scratch the poor bride to death!  I also didn't want any doubling over back under the threads as it would probably offend on both counts.

I apologise for the 'cast' on some of the photos.  Much of that came from the fact that there was a layer of reflective water soluble stabilizer underneath and was pretty hard to work around at times, photographically speaking.

The beads and jewel embellishments follow on Friday.  Join me then! ☺

Text and images © Elizabeth Braun 2017

Friday, 17 February 2017

Wedding Dress Modesty Panel - Silver Threads


Time for part three of this project and stage three - working the silver outlines and stems.

As is true of many embroiderers, my go to metallic thread brand is almost always Kreinik.  It's pretty rare that they don't have what I need and I have a good supply of their threads in stock.  Japan Threads #1, 5 and 7 were perfect for this project.  I used #5 to work the larger flower centres and #7 matched the silver work on the dress exactly.  I used #1 as a couching thread. I just needed to take care to make sure that each couching stitch went over a net thread or else it would be useless in holding the Japan #7 thread down once the stabilizer was dissolved.

Here are a few photos showing progress though the piece.  They're self explanatory really, so minimal text today. ☺


The light was reflecting to beautifully off the silk flowers and the silver metallic thread, so I had to take this shot and try to capture at least some of it.  Those of you who've seen this kind of work in the 'flesh' will know just how limited even the best photography is, but it gives a good idea.

I was posting regular updates on Instagram and was delighted around about this stage to know I was definitely on the right track as I got the comment "I love love love it!" from the bride. ♥


I had wanted to have a gap in the silver thread above the 3-leaf section just either side of the top centre and put jewels in the gap, but it would have been too hard to sink to the end without being very visible, so I re-jigged it to put the jewels either side of a line instead,

By this point, it was already beginning to look quite complete, but there were still two more types of trim to add.  More on that next time.

Text and images © Elizabeth Braun 2017

Wednesday, 15 February 2017

Work in Progress Wednesday - 15 February 2017

I confess, I'm not getting a lot of embroidery done at the moment.  To be honest, I'm more into knitting just now as I'm doing baby projects both for this year's Shows and also for friends' newborns.  I've also been stashing some yarn for some knits for myself.  More on those projects on Sunday...

At least I've got a little more progress on the everlasting violet thread painting to share.  I'm expecting to need this for a special greetings card in May, but there may be up to two more also needed, so I really should get back going with it.


I took this photos with my phone, so the colour isn't quite as faithful as I can get it using my camera.  I need a few things sorting on my technology - camera battery door fixing, new laptop battery and the power supply 'pin' thingy fixing, so I hope to get to that as soon as I can and be able to work more comfortably instead of having to compensate for some problem most of the time.  Frustrating!

Join me again on Friday for the next instalment in the wedding dress modesty panel series.

☺♥☻

Text and images © Elizabeth Braun 2017

Monday, 13 February 2017

Wedding Dress Modesty Panel - Cream silk stitching


Welcome to part two of the wedding dress panel series.  Today we're looking at the creation of the basic satin stitched flower and leaf motifs. I had a couple of kind comments on the stitchery from the last post, but I only showed photos of the embroidery and embellishments on the dress proper, i.e. not my work at all. Sorry for any confusion there, it seems I wasn't sufficiently clear. From now on, all the work is mine! 

To be honest, a lot of them were not worked terribly well, especially not the smaller flowers, which weren't that easy to create.  However, I wasn't too worried about that as I knew the dodgy parts would be covered by outlining and beads, so I could get away with working a few flowers before finding the best method.  Above you can see all the small motifs done - a first milestone, then below a detail shot of one part once the first of that medium flowers was complete.


It was at the point in the 3rd photo that I ran out of thread!  I'd badly underestimated the amount of silk needed and thought that what I had in stock would do.  It didn't - not nearly!

The next part of the drama was to source a supplier who didn't charge the earth for shipping and would do so quickly, so not Barnyarns this time, but Silken Strands - a small, family business based in Wales.  Highly recommended for speed of service and reasonable postage costs.  I confess to having enjoyed 24 hours off the project to catch up with some other tasks whilst the threads arrived ☺

Drama stage three was receiving the threads (I bought two packs to be sure of having enough!) and finding that they were a whole shade lighter than the original one I'd had a few years!  Possibly it had darkened in storage.  Anyway, Janet and I agreed that, in view of the timing, it was more important to carry straight on and hope it wouldn't show later on than to try and source another shade.  Those of you who are, like me, very sensitive to nuances of colour (and have good screen resolution) may be able to see where one shade ends and the second began.  It was clearer in real life and screamed almost painfully at me....

You can see the colour difference again here in this close up, but it fades into less significance when the whole lot of the silk work is done.  To be honest, that colour change was the only real disappointment to me in this project.


That's it for this time.  Next time I'll be taking you on a tour of the silver work parts.

Text and images © Elizabeth Braun 2017

Friday, 10 February 2017

Wedding Dress Modesty Panel - design and sampling

Here's the project many readers have been waiting to read more about - the wedding dress modesty panel.  Today's introductory instalment covers the purpose, design and transfer of the project and is the first in a series of seven posts.

My lovely young friend, Lauren, has been living mostly in Ghana for the last couple of years and, as often happens, met and fell in love with a nice, local chap. ☺♥☻ Their wedding date was set for mid December and she bought both of their wedding outfits on a long trip back to the UK.

However, there was a small problem with the bridal dress - it's a bit low at the back.  By European standards, it was pretty decent, with the back finishing around about bra level, but by Ghanaian standards, it was too low for polite company.  To quote the bride, "You can flash your boobs any day of the week, but one flash of a woman's back....!"  So, in order to avoid offending local cultural sensibilities, Lauren sent me this photo of the needed 'addition' and asked me if I could help out with some embroidery to make it look like it was part of the dress.  I quite liked the idea of the challenge and hopped on a train over to her parents' place in Halifax clutching my art box which I'd refilled with white, cream and silver threads of all types.

Here I am determining the size and shape of the panel - running carefully around the edge with some red sewing cotton and a tapestry needle so as not to jab into her!


After lots of holding up threads against the stitchery on the dress (which seemed to have been done in machine rayon and silver Jap style thread, then hand embellished), and then trialling some on some scrap net pieces, these are the threads that matched best with the original materials and survived the necessary work process.


I worked a couple of small samples, this one trialling a couple of different Madeira shades - ecru/2404 and off white, and also trying out some of the beads and sparklies Lauren and her mum, Janet - an accomplished seamstress, had bought in for the project.  You might also notice a sort of 'haze' on this photo, as if there were a plastic bag or something underneath the net.  Well, in a way there is, as I had to used Romeo water soluble stabilizer to work this piece.  The net is quite fine, but nothing like fine enough to be able to hand work enough stitches on easily.  Stabilizer provided the perfect solution.  Once the stitchery is complete, you just rinse it out well.


Naturally, I took a lot of photos of the embroidery design on the dress and here are some of the details from those pictures.  I used these not only to create a suitable pattern using motifs as close as possible to the originals, but also to get more of an insight into how they were worked and how best to set about it myself. NB These 3 photos are from the dress proper and are not my work.


After looking at it for a while, I traced around the edge of the panel and began to put together a design idea trying to make it look as 'at home' as possible.  I'd been told not to worry as Lauren's hair would cover it much of the time and it just needed to give an idea, but, hey, this is me!  It had to be spot on, right?? ☺


Here it is set up in the hoop after the tricky task of tracing the outlines onto the net using a fine black biro.  You can clearly see the stabilizer here and also that I tacked along the top and bottom of the panel to keep it still.  Given that the net's just that little bit stretchy, I had to be very careful not to have it held taut in the hoop, but to sit as it would in the dress.  The Romeo 'fabric' acted as a stabiliser in that sense too.

Next time I'll show you the first stage of the stitching - the ecru silk flowers and leaf motifs.

Text and images © Elizabeth Braun 2017

 
Google+