Showing posts with label Friends. Show all posts

Friday, 3 March 2017

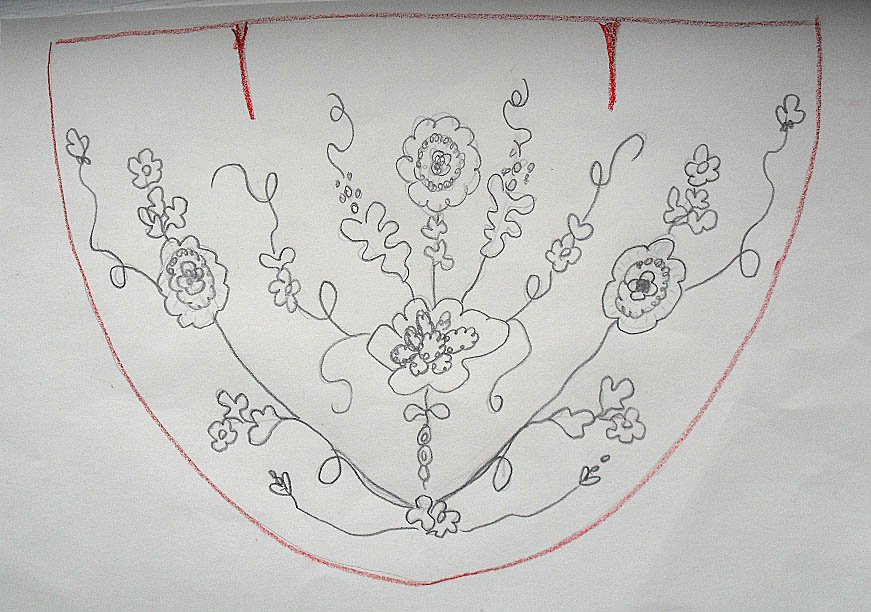
Wedding Dress Modesty Panel - fitting and wearing

Here's the last instalment in the adventures of a wedding dress modesty panel.  I'm not involved in any of this section - except that I took one of the two wedding screenshot photos.  All other photos etc in this post are from the bride's family and friends over in Ghana on the Big Day.

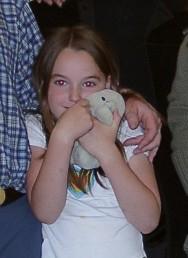
The bride's dad sent me this lovely shot of her getting out her dress and receiving the modesty panel ready for fitting.  It came along with a heart warming message:

"Lauren really happy with your work. Thank you soooooo much."

In the same photo batch came this one of fitting in progress.  Janet, the bride's mum, is a very accomplished seamstress who also made a Ghanaian style outfit for herself for the day. ☺


And here it is in action!  Photos etc were coming in during the ceremony to all Lauren's friends here in the UK and I was busting with flattered vanity when I saw that she had deliberately sat during the ceremony with her hair on one side so as to show off the panel - the one that was meant to be hidden!! ☺♥☺

It did get hidden during the more 'active' parts, but you can see a tiny bit of it here during the wedding vows (my screenshot photo).


"Screenshot?  How come?"  I hear you ask?  Well, as so many family members and friends weren't able to go over to Africa for the wedding, the whole ceremony was streamed live via YouTube and left on for catch up later for people who weren't able to join at the actual time (including us).

In this scene - the legal registration required by Ghana law before the religious ceremony, you can see dad in the background holding up his phone so that the bride's eldest brother, who lives in China, could 'be there' in real time.  On the other side was her 2nd brother enabling their 3rd brother (who has a tiny daughter) and maternal grandparents back home in the UK via his phone.  It was a truly intercontinental event!  Marvellous! ♥


Along with these two beautiful photographs that came from the newlyweds a few days later, I got a lovely recorded message telling me that many people had commented how nice her dress was at the back. (Vanity swells again!!)

A most successful project, I think.  The fact that people were complimenting her on the appearance of the panel means that it served its purpose well and that no-one was offended by too much skin in the wrong place.  That was the main thing.

Of course, I'm delighted with the results too. ☺  I'm wondering now if I'll ever get chance to do any more projects like this....

I'll conclude this project with this Very Lauren screenshot from the wedding talk. ☺♥☻

The card and 'regular' gift coming up next!

Text and images © Elizabeth Braun 2017

Friday, 10 February 2017

Wedding Dress Modesty Panel - design and sampling

Here's the project many readers have been waiting to read more about - the wedding dress modesty panel.  Today's introductory instalment covers the purpose, design and transfer of the project and is the first in a series of seven posts.

My lovely young friend, Lauren, has been living mostly in Ghana for the last couple of years and, as often happens, met and fell in love with a nice, local chap. ☺♥☻ Their wedding date was set for mid December and she bought both of their wedding outfits on a long trip back to the UK.

However, there was a small problem with the bridal dress - it's a bit low at the back.  By European standards, it was pretty decent, with the back finishing around about bra level, but by Ghanaian standards, it was too low for polite company.  To quote the bride, "You can flash your boobs any day of the week, but one flash of a woman's back....!"  So, in order to avoid offending local cultural sensibilities, Lauren sent me this photo of the needed 'addition' and asked me if I could help out with some embroidery to make it look like it was part of the dress.  I quite liked the idea of the challenge and hopped on a train over to her parents' place in Halifax clutching my art box which I'd refilled with white, cream and silver threads of all types.

Here I am determining the size and shape of the panel - running carefully around the edge with some red sewing cotton and a tapestry needle so as not to jab into her!


After lots of holding up threads against the stitchery on the dress (which seemed to have been done in machine rayon and silver Jap style thread, then hand embellished), and then trialling some on some scrap net pieces, these are the threads that matched best with the original materials and survived the necessary work process.


I worked a couple of small samples, this one trialling a couple of different Madeira shades - ecru/2404 and off white, and also trying out some of the beads and sparklies Lauren and her mum, Janet - an accomplished seamstress, had bought in for the project.  You might also notice a sort of 'haze' on this photo, as if there were a plastic bag or something underneath the net.  Well, in a way there is, as I had to used Romeo water soluble stabilizer to work this piece.  The net is quite fine, but nothing like fine enough to be able to hand work enough stitches on easily.  Stabilizer provided the perfect solution.  Once the stitchery is complete, you just rinse it out well.


Naturally, I took a lot of photos of the embroidery design on the dress and here are some of the details from those pictures.  I used these not only to create a suitable pattern using motifs as close as possible to the originals, but also to get more of an insight into how they were worked and how best to set about it myself. NB These 3 photos are from the dress proper and are not my work.


After looking at it for a while, I traced around the edge of the panel and began to put together a design idea trying to make it look as 'at home' as possible.  I'd been told not to worry as Lauren's hair would cover it much of the time and it just needed to give an idea, but, hey, this is me!  It had to be spot on, right?? ☺


Here it is set up in the hoop after the tricky task of tracing the outlines onto the net using a fine black biro.  You can clearly see the stabilizer here and also that I tacked along the top and bottom of the panel to keep it still.  Given that the net's just that little bit stretchy, I had to be very careful not to have it held taut in the hoop, but to sit as it would in the dress.  The Romeo 'fabric' acted as a stabiliser in that sense too.

Next time I'll show you the first stage of the stitching - the ecru silk flowers and leaf motifs.

Text and images © Elizabeth Braun 2017

Friday, 25 July 2014

Ring Bearer Cushion/Pillow - completed project and the wedding!

Here's the finished embroidery still in the hoop.

Below is a close up of the lower leaf section, (about the only close up shot that came out well!!!)

The finished item from various angles:


Worked in DMC and Anchor stranded cottons, and Mill Hill petite seed beads.

You may have noticed that the first, in the hoop pictures didn't feature any tiny dewdrop beads.  Well, there's a story behind that!  When the stitchery was finished, I decided that it didn't need any other trims and decided just to make it up without beading etc.  However....

When I was pressing the flatwork from behind, the silk went all puckery and odd.  I knew it was nothing to do with the backing or the iron being too hot, but I didn't know how to solve it.  So, I tried steaming it with the iron.  That's when our delightful and rather ancient steam iron decided to spew out jets of rusty water all over my precious embroidery!  You can imagine the howl of horror I let out!  I'm glad Sir was in the States at an academic conference at the time as I may otherwise have wasted time taking it to show him the disaster.  As it was, I ran straight to the bathroom washbasin to rinse out as many of the marks as I possibly could under the cold tap.  I was more relieved than I can tell you that the vast majority of them came straight out.  Phew!

Next I pressed what I could of the un-embroidered areas with the iron on cool (and steam OFF!) and then put the whole thing back in it's original hoop and set it in front of my study fan heater to dry again.  Not only did it dry nicely, but it also pulled out all those original funny puckers!!  I was left with one or two light brown marks that most people wouldn't have noticed, but that weren't good enough for me.  So, I got out the petite seed beads and put one on top of each tiny mark!  I added a few more in certain unmarked areas to even things up a bit.

I won't try your patience with all the hassles incurred whilst putting it together, I'll only say that I had neither time, desire nor inclination to add the braids I'd made.  It really didn't add anything to the finished product and I was feeling a spot on the stressed side by this time.  Anyway, into a Tesco zip-lock freezer bag and then into a gift box it went, ready to hand over to the happy couple.=)


When I'd managed to calm fully down, I felt quite proud of my work and although one or two of the friends I told the near miss story to said, 'You shouldn't tell people that', I realised I wasn't only enjoying having a tale to tell, I was also rather proud of having done a good rescue job.=) LOL!

Here's the piece 'in action':


And here's the happy couple after the ceremony posing for their promised photo with their gift.=)

I really did learn huge amounts from this project.  As usual, that was more what not to do next time than anything, but it was a good learning process, if a little tense at times!

Now then, what's next up....?

Text and images © Elizabeth Braun 2014

Saturday, 5 July 2014

Ring Cushion in the hoop (plus the wedding rehearsal!)

Sigh! I'm having a time and a half getting an even partway decent photo of the work done so far on the ring cushion embroidery! All the pictures turn out with fabric looking no lighter than mid-grey instead of bright white. I'm going to have to try to get later shots outside, I think, but it's rather hard where I live to find a suitable place for it. Maybe I could use our car bonnet/hood!!  Anyway, here's the first day's work.  Below is the shot I took just a few minutes ago after four sessions (and after all earlier photos were rejected for execrable quality!)  This one is quite bad enough, but those made it look good....


Some parts I'm happy with, some not so good, but I'm hoping that they'll look much better once things like sepals and stems appear.

Last night was the rehearsal, so I cobbled up a quick dummy cushion so that it could be used.  Here you can see my trialling two of my own rings on the mock up to test the padding.  What I've done is to cut, in effect, three squares of lightweight quilt batting and cut holes in the centre of two of them so that there's a distinct dip where the rings can lay safely.  A few people at the rehearsal actually thought this was the real thing and was really nice!!!=)  I was just thinking the other day how very easy many people are to impress....

Here's the dummy run of the 'rings bit'.  Marion (the bride) kindly agreed to let me trial the real rings to give the padding a thorough test, although this fabric is smoother than the real thing will be with embroidery standing proud and natural slubs in the silk.  As you can see, the best man is bringing the rings over.


The rehearsal was a very international event.  Above you have the bride (French) and groom (Malaysian), with the witnesses - the best man and his (Japanese) wife, as well as Sir (German) by the door checking the list of what happens when.  On the right is the chairman (sitting down) who will be giving the announcements in Chinese as well as English for the groom's family.=)  The second photo is the team discussing arrangements for the post ceremony catering.  Rod, seated on the right, was the perfect choice being unashamed to admit how much he LOVES his food!!=)

The chairman's wife had commented on what nice fabric the mock up cushion was and I said that, yes, if one were to trim it up around the edges, one could make it into something simple, but pretty enough.  So, that got me thinking about making some braids to trim up the edges of the real thing and these are the threads I fished out last night.  Of course, I won't be using them all and the choice of metallic will be influenced by which goes best with the final looks of the design.

The couple's rings are white gold, so silver coloured, so I rejected bright, yellow golds at once and left silver and the two soft golds out to choose from later on.

I also thought a few of these tiny beads would look nice around the finished design to add some sparkle.  They're the iridescent ones on a more or less clear 'base', (as opposed to a white basis) and look rather pretty.

So, still plenty to do, but the stitchery is progressing quite well and ideas are still flowing for making improvements.  More next weekend!

Text and images © Elizabeth Braun 2014

Tuesday, 18 April 2006

The Wedding!

Managed to get the 'wedding' bellpull done in time, (finished putting it on the hanger in the car on the way to the ceremony!!!), and ,<-here it is.

And this is me with the happy couple receiving their new gift. Just wish I'd got my glasses off fast enough - vanity!


Here's me having the long awaited 'Victory Dance' with my friend, Caleb. About 18 months ago in one of his e-mails he told me he'd been to an Irish barn dance the night before. I replied that, if I ever got better, (I had ME/CFS for 3-4 years), I would dance a set with him and here we jolly well are! One of my other friends told me she didn't expect to see me the next day as she thought I'd be wrecked for ages. Well, this time last year, I would have been virtually crippled for a week or more after just one dance, but after 4 barn dance sets, plus some other stuff, I was perfectly OK. No pay-back fatigue or malaise whatsoever. Yippee!=) So, if you have ME, CFS or FMS and are considering trying Mickel or Reverse Therapy, let me encourage you: Ignore the popular skepticism and misinformation and give it a try. It's hard going, but IT WORKS!

Tuesday, 1 November 2005

Photos Galore!

Lots of photos to share today! The first one is a card that my friend, Yang Liu, gave me the other day. I thought it was absolutely delightful. Here it is:

Next up is the stitching complete on the L*K piece. As anyone whose familiar with the original pattern will know, I've changed it a bit. As it will eventually be framed and hang outside our flat, I just put 'Welcome' on and centralised it rather than the whole 'Welcome all Seasons' bit. I changed a few colours too. For the lettering I just used GAST's 'Fragrant Cloves' as that had a lot of colour variation in it and I thought orange would be a nice change and stand out from the rest of the piece. I also made the strawberries dark red, (used GAST 'Buckeye Scarlet' in the end as the KK thread was really too bright for the whole tone of this piece), and the yellow flower 'Daffodil' instead of the duller shade prescribed. Anyway, we're pleased with the finished result and look forward to having a bit of cash to spare for framing! Here it is un-framed for the time being:

Last is the new WIP, another hardanger cushion/pillow cover. This one is a bit 'bittier' than the last one as the satin stitch blocks are a fair way apart and so there's a lot of stopping and starting. A few colour changes again in that the pink the designer used is being done in Anchor Multi-colour Blue Hawaii, one of my favourites and the bead work won't be yellow/gold, but will be that nice iridescent lilacy shade you can just make out in this photo:

Updates soon....

Sunday, 2 October 2005


Introducing Ellie!

This is my young chum Ellie (with my toy sheep, Flossy) who wanted to be on my Blog and would like the world to know that she's a monkey!

See? I did put you on-line after all, Ellie! Now, how do you like being world famous??=)

 
Google+