Showing posts with label Fabric Colouring. Show all posts

Monday, 18 August 2014

Needlequest Update - 18 August 2014

Hi!  Welcome to another week and another Needlequest update and piece completed.=)  This is a rather experimental small piece, but I'm quite pleased with the finish,

First I painted the whole flower using the paints I showed you last NQ post.  I was amazed at just how pearlescent the pearl paint is, even more than the metallic, I think!

I created the colours I wanted by mixing pearl, metallic and regular fabric paints together and, although one of the greens came out a little more lurid than I'd wanted, (I should have added red earlier than I did!) I was favourably surprised at how well I'd remembered colour mixing theory!!!

The next stage was to select some colours to stitch with.  I decided to use some of my new DMC threads for two reasons: 1) I bought them and want to use them; and 2) They're easier to select from as they're still all hanging around in clear plastic bags in colour groups, so I can just pick them up and see what I want straight away, rather than mess around with the Anchor colour chart and then fishing the skeins out of the box.  Oh, yes, there's another reason for choosing DMC for this project and that is that, as several other experienced stitchers have noted, DMC shades are brighter and just that little bit shinier than Anchor ones.  One project needs one type and another project the other brand.

Here are the colours I pulled out.  I used five of them - both yellows, both pinks and the brownest green, #580.


Here are the results, the top photo showing detail and the contrasting textures and the second shot giving an overview of the whole piece.


I just need to mount it in a card blank now and get it in the post to my brother tomorrow as his anniversary is on Wednesday.=)

Something for my fellow Needlequesters to think over:

I've noticed that techniques and styles seem to attract better levels of participation than design themes do, so I'm planning on changing the topics for two of the four remaining months of the challenge.  I'm going to leave September as 'Autumn' as that's a fairly easy design theme to work with and, of course, 'Stumpwork' will stay in.  Other than that, I'm considering two from '3D Stitches', 'Hardanger' and 'Miniaturisation' for the other two months.  Any preferences?  Also, as stumpwork and 3D stitches are related, which order should it all go in if we had both of those, would you say?

Text and images © Elizabeth Braun 2014

Monday, 11 August 2014

Needlequest update - 11 August 2014

Here we are again, working on a new theme/technique and I decided to use the lovely hibiscus thread painting from one of Trish Burr's books as the basis of my first (hopefully, i.e. I hope I'll be able to do more than one) experiment this month.  First I did a quick pastel drawing of it on some light blue paper.  The contrast is greater in reality, but it does show up a little here.


I've prepared this piece of blue fabric to work on and am thinking of using these pretty, metallic and pearl fabric paints to provide most of the colour in the piece.

I'll do the leaf in non-shiny paints, I suppose.  The metallic paint pack I bought didn't include the red or green shades, which I thought was a shame, and they only do larger sizes (the same size as the pearl white) in those.  I wouldn't mind that in theory, but in practice, my paint drawer is already full.=)

After painting the flower, I plan to pick out some details in stitch and, all being well, mount it in a card for my big bro's 20th wedding.  As that's in just over a week, I'd better get on with it....  

I had hoped to have got further along by now, but I've been spring cleaning (OK, just pretend I live in the southern hemisphere if you're picky!!), and have been devoting my time to mucking out the bedroom, living room and my study.  Ugh!  All that dust under the bedside tables (nightstands) etc.  No small wonder I was sneezing, dealing with itchy eyes and a runny nose!  I've been allergic to large amounts of dust over the past five years.  Strange.  I never was before.

Text and images © Elizabeth Braun 2014

Monday, 15 October 2012

A Little Ribbon Embroidery

I've had a couple of Crafty Ribbons kits in my kit drawer for a while now and have been meaning to get them worked up.  However, when looking at the designs, I couldn't help but feel that the best hadn't been made of its potential.  This is the 'original', what do you think?  You get a small square of black fabric to work it on and, yes, it's plenty big enough for the design, but really nothing like big enough to put in a hoop.  In fact, although this is my fourth kit of this brand, I've never once used the fabric supplied in the package owing to its over small size.

I decided that the first thing to do was to create a new background and, as I had three small projects in mind that I wanted non-plain backgrounds for (including another kit by CR, the colour choices for which make me wonder how they could bring themselves to put it into production....), I decided to have a go at a bit of painting.  Below are the materials I thought I'd use, meaning to do natural, landscapey sorts of things with them.


And below again are the materials I actually used!!


This is what the piece of fabric with the three painted sections looked like when wet.  Notice that I wet the whole area I wanted to paint first so that the colours merged and spread out well on the fabric. 


And this is what it looked like dry - considerably lighter.  As you can see from the tubes of paint photo, I've used watercolours and I really should have remembered how much lighter they dry.  Having said that, I didn't really mind the change too much as I've made the mistake of having an over-poweringly painted background before.  I also learned that Sap Green' dries with quite a hard edge (as does Permanent Rose to a degree) - something to look out for another time.


The middle of the three was the one intended for this ribbon piece as I wanted to give the impression of a pot of flowers in a yard with a wall/fence (the brown-ish colour) and some greenery (the green spots dropped into the brown whilst still wet), on a paved area (the grey at the bottom).

The embroidery itself took around an hour and, as it was done in evening light and was a quick stitch, there are no WIP photos this time, but here's the finished piece, mounted in a card and looking a lot nicer, I think!


Do you agree?  I do like the general design and love the plant pot button - in fact I'm planning to get hold of a few, probably from the Crafty Ribbons booth at the Harrogate Knitting and Stitching Show, presuming they'll be there.  So that part was good, but I think the black background, to say nothing of the awful slightly blurred and totally 'flat' photograph on the kit was a big no-no.  Not surprisingly, I got this as part of a sale on their website - discontinued kits.

PS, In case anyone's wondering what's planned for the other two painted backgrounds, the simple answer is nothing.  I found the green on the left hand one just too vibrant and felt it didn't go with the ribbon piece I had in mind and the right hand idea just no longer works for me.  I was going to do a small sampler with a crazy quilt appearance as a support for my catch-up on TAST.  I still quite like the idea, but don't think this one worked and so will consider trying another one soon.

Text and images © Elizabeth Braun 2012

Sunday, 8 January 2012

TAST 2012 - Week One - Fly Stitch

When I saw the ideas and examples Sharon had put up for the first stitch of the TAST 2012 re-run, I was immediately inspired with plenty of ideas.  I also got out my two stitch guides and found enough variations to fuel the creative process further and, soon afterwards, came up with a design plan for my first TAST sampler. I know that most of the notes didn't show up well, so I must remember to use pencil in a better contrasting shade if I want everyone to be able to read what I've written!

Like Jules (whose wonderful dandelion seed head worked in fly stitch you absolutely MUST see!), I plan to do a doodle pad type stitch sample, then try to work it up into something pictorial.  I can't promise that I'll always manage the pic, but I can try and at least got off to a good start this week.

Here's the quick test run of the stitches to make sure I'd got them sorted worked with scrap ends of no.5 pearl cottons on a piece of rather stiff 14ct Aida (that there was no chance of my using for anything 'polished').  The first few are just plain fly stitches, then a few with longer tails, then a few twisted fly stitches.  The second row shows a rather open worked fly stitch leaf (which does not work well on Aida) and then two rows of fly stitch filling.  This is done by working a row of regular fly stitches with the tops of the Vs touching, then working the next row upside down with the bottoms of the Vs joining and the securing stitch being made over the pair of touching stitches.  This filling spoke 'fence' to me.

First I painted some habotai silk to give the relevant colours to the background.  I made the mistake of putting the whole thing rather too far to the right of the hoop.  It would have been better to have been more central.  Still, I soon realised both the error and that I couldn't really do anything about it, except to ditch that piece and start again, but although I found I had more habotai than I'd feared, I'm still not up for wastage.  It was good to try silk painting again, even though I found it a fair bit harder than I'd remembered.  Need more practice, I know and having more fabric than I thought means that I can try this kind of background again soon.=)

So, here's the finished fly stitch pictorial piece.  Most of the stitches are some form of fly stitch, except some stem stitch for the foreground roses and, of course, the ribbon work (although you can work fly stitch in narrow ribbon to good effect).  The peach flowers are just straight stitches in ribbons, and the roses are spider's web roses.  Let me know if you want to know how the latter are done as they're easy, quick and effective.  The grass tufts are individual twisted fly stitches and the rose leaves are worked in closed fly stitch.


On the whole I'm happy with the piece.  The bit I'd most like to change (and could have if I'd been up for a lot of un-picking and re-stitching) would be to work the fence in a narrower gauge of thread.  I feel it's far too prominent, although the basic idea etc is OK.  Even with that, I'm pleased with this first week's work as I've been able to use fabric colouring again, I've designed something completely from scratch with little more inspiration than the stitches themselves and I worked it completely freehand - no pattern transferred to the silk.  Oh yes, and I really know fly stitch and a few variations of it quite well now!!

What's that just about the roses?  Well, of course it's a FLY!=)

© Elizabeth Braun 2012

Friday, 9 December 2011

Why I'm Looking Forward to TAST 2012

If you haven't heard that Sharon B from Pin Tangle is re-running Take a Stitch on Tuesday next year, then where have you been??!=)  Umpteen stitching bloggers have posted about it already, but in case you've missed it, then here's the challenge home page and there's also a permanent link to it in my sidebar.

So, there'll be a different stitch posted and demonstrated each Tuesday, giving a whopping great 550 (and increasing) stitchers the chance to learn new skills and find new points of departure for old ones.  For some, almost every stitch will be a new challenge as they're new to surface work.  Others will revisit old friends and make new and yet others will just join in for consolidation and fun.  I fall into the middle group really as I have a passable repertoire, but still have plenty to learn and discover.

What I'm really looking forward to about it is not actually the learning of new stitches - as I have a number of stitch guides and I learn stuff here and there when working new styles/designs etc and that's fine.  I suppose I learn what I need to as and when I need it.  For me, the big thing is a bit beyond that -more into creative design and usage of the stitches covered.  In effect, I'm looking at it as a sort of City & Guilds samples project revisited.  Throughout this posting, you can see some of the small pieces I did whilst working on the City & Guilds level 3 certificate in embroidery, (which I, sadly, wasn't able to finish) and you may have seen already on my C&G page here.

Working through the design module and samples project, we had five design elements and five major themes, broken down into smaller areas each time and a type of work and/or number of stitches learned with which we were to interpret our designs.  To make that clearer, the syllabus requires that you cover line, colour, shape, form and texture.  Our teacher chose big themes for each area, so line was living creatures, colour was gardens and flowers, texture was buildings, shape was Art Nouveau and form was landforms.  Each week we then had a smaller area to produce some artwork and a design from which we would then interpret in textiles and suitable stitches.  Here you see my shell as part of the line module interpreted in linear stitches.  Above are samples from the colour section, one topic being flower borders, which was then worked in knot stitches on painted silk and other was hedgerows being worked with broderie anglaise stitches.

What I'm trying to say here is that I would like to do something like that again.  I think it will take a few weeks of the challenge to see how well it can be achieved as I don't know how much can be done in this way with just one major stitch (although there's no reason why one can't use others to support it, as long as the main TAST stitch of the week is the central thing, no?), and I'll have to chose my own themes and topics, which could lead to less creativity in that I may just settle for the easy option instead of challenging myself like the C&G classes did.  The sample you see here is a section of snakeskin done in loom bead-weaving!  I was rather disappointed when I went to the local C&G micro-centre last summer to see their exhibitions and could see none of the obvious design inspiration that I was used to from my old course.  Everything looked like shapeless masses of stitches instead of resembling something and that just wasn't what I wanted...=(

I also want to use more of the lovely fabric colouring things I bought for the C&G course, such as these silk paints, fabric paints and dyes.  I also have watercolour paints, which Kit Nicol (amongst others) uses in her pieces to colour her backgrounds, and some Derwent Inktense pencils, which can be used in a similar way to silk paints and dyes.

Here's something quite novel that I thought would make an interesting fabric colouring method.  Can you tell what it is?  To the left is the matte palette and on the right are the shimmer shades

Yes, you're right!  It is, indeed, eye-shadow!  And look at all those useful brown and green shades!  I got these two palettes on e-bay and, aside from the feeling that they could have made more of the 88 shades they had (given a better spectrum, and certainly fewer greens!!!), I love them and am keen to put them to other uses than what they were originally designed for - although I like them as make-up as well.=)  Despite being quite cheap, Chinese made products, they're actually quite good and, with a layer of primer, last surprisingly well and have plenty of pigment so give a good colour pay off.  Not that I've been brave enough to use that vibrant emerald green on my eyes...

Speaking of things Chinese, I'll leave you with this wonderful example of Oriental initiative and multi-tasking.  Here's one of our Chinese friends, Yufei, selecting from the menu, whilst balancing her 4 month old son's bottle with her chin.=)  Priceless, isn't it??

And it's snowing.....

Of course, by the time I'd finished the fine-tuning of this posting, the snow had stopped and the sun came out!!!=)  Never let it be said that British weather is monotonous!

© Elizabeth Braun 2011

Thursday, 14 May 2009

Last C&G Sample and Colour Display

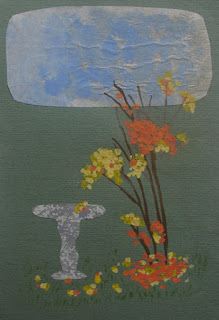
This is the last of the Samples Project I'm able to share with you. Today was the last working day at College and I really only went to prepare my display, which took most of the day to mount!! This sample was meant to be of manipulated fabric techniques, but I confess, I didn't finish it and get to that part. I've posted this one before to some degree, but here it is in the full line up. The sources were a sapling opposite our flats and a bird table I found on-line. Here we have a pastel picture of the two together, then a collage using painted papers etc, and then the sample which is worked in over-dyed threads (yes, GAST and WDW) on a fabric painted background. A bit lurid and makes it look springlike when it's meant to be autumnal, but it could be worse!!


Below is the Colour Module display that I've done for the College end of year exhibition next week. The photo was awful as my new camera just won't take indoor pix without blurring them horribly. I couldn't manage with the old one - having to hold the battery door shut - in the middle of the studio etc. DH is getting me a lovely new one that will take pictures in dim light and all sorts - great for museum collections where photography is sometimes allowed, but lights are low and flashes a no-go. I just got this pic to show it all together. I think I'll try and take a better one when I bring it home and can use the old camera on it, but you can see how I put in white mounts for most pieces and also used some other colours of card and paper to tone in with the artwork and samples etc. Do you think it works?


So, that's it for City & Guilds for me for the foreseeable future. I'm not sure if I'll go back after our year away and re-start as the whole programme is changing and, whilst it seems somewhat less work and not too bad, I just don't know. We'll see.

Now that's out of the way, I can get back to some of my 'regular' stitching. =)

Monday, 11 May 2009

Coloured Broderie Anglaise Sample

One more sample done.=) Sadly, I can't find the source image at the moment as my laptop has died (we think the motherboard has gone - RIP Laptop!) and it's on there rather than the PC I'm posting from right now. Once I can get at the laptop's hard-drive to take my files, contacts and bookmarks off, I can add it in here, but for now I'll have to just present the pastel painting of the source photo, which doesn't look too much different from the real thing, and the stitched sample. This time we have a broderie anglaise piece worked in colour (as opposed to the traditional white on white) and on a piece of fabric that I dyed back in Decemeber.


Here also are a drawing and a collage of Haddon Hall in Derbyshire, UK, where Zeferelli's 'Jane Eyre' was filmed and which also appeared in the 2005 film version of 'Pride and Prejudice'. This was work for the first sample in the 'Texture' module, although I got no further than a total of 3 pieces of art for that!


Neither are spectacular, but the shapes are generally OK. I think the drawing is really lacking depth of colour in the main - the walls are too insipid, but I seem a bit short of serviceable grey shades of pencil, other than standard graphite. Art materials are one of the many things that are cheaper in Taiwan, so I'll stock up a bit there - and probably get a new laptop there as well.

Before my laptop did totally die (after 2 'sick' periods), I was able to do some pruning on my blog and deleted over 80 posts that were really saying nothing and editted probably as many. So, about 30% of it has now gone, which should make finding stuff and reading back for new visitors that much easier.

More art and stitching photos to come soon as I have also been working on the autumn tree sample and have taken photos of some other design/artwork that I've been doing for the C&G and will post that in spates with stitching WIPs.

Monday, 13 April 2009

IDIOT! (Lots of photos)

I can't believe I did this, but I actually managed to irretrievably delete 2 old posts whilst trying to change the labels on them! Thankfully, I have some idea what they were about, so I'm going to re-hash them here so as not to lose the record.


The first is the first sample from my C&G Colour module, which was a flower border. Here it is from source image, through rubbishy gouache painting (first time using this kind of watercolour) to finished piece of stitchery:


Second was my silk-painted, 'quilted' hibiscus sample (#8 for my C&G) and here's the photo collection from source image, through artwork to finished sample.


I was going to add in some artwork from a previous resolved piece, but I can't get the image to move. I may well have over-done the amount of images allowed per post, so that'll have to wait until next time. I will now add the correct labels and try, in future, not to do such dumb things again! Duhhhh!

I went through my kits yesterday and started to plan which to take with me East this summer. Some of them will get packaging dumped and instructions scanned/re-typed and designs transferred etc first - anything to keep the weight down! 20kg of stuff, plus 7kg (and a laptop) cabin baggage is not much for a year! Glad EVA allow you to take a laptop as a separate piece of hand luggage, although it might be a challenge getting that through the airports, which are strictly one piece in the UK. We'll think of something.=) Yes, Von, I agree that this could well be the reason no job came up. I was rather thinking that myself....

Tuesday, 17 March 2009

Current Sample Progress

Well, it's not strictly speaking the current sample, rather one that should have been done last November and that's when I did the artwork for it, but I'll show that when the piece is finished and I do my usual display of all pix from design inspiration to finished sample.

It's sample #9 and is not yet finished. In fact, you can't even see all of it here, just the part I've been working on - the leaves on the tree, autumnal to match the season as it was started. The background is painted with ordinary fabric paint, as is the main part of the tree, which I then brought forward by stitching in both dark and light bits. Although it's part of the colour module, (thus the painting and also the use of WDW and GAST threads), this is meant to be one of the manipulated fabric technique samples. You can't see any of that so far, but there is a bird table to be added as a hard slip and I decided to do some of the piles of leaves on the ground as small soft slips as the stones I painted to add on would really look out of place, (although I might prepare one or two to see if they could fit at all).

As mentioned above, this is sample #9 and this week will be #24, so you get some idea of how far behind I am! Having said that, #10 & #11 are done and #12 is in progress and there's artwork done for #13, #17 and #20.


Just started volume 2 of 'The Doctor's Wife' and, yes, I urgently want to slap that idiot girl!! Anyone who's read it, (or 'Madame Bovary') will understand why!

Tuesday, 27 January 2009

Lots of college work done

Spent much of yesterday and some of the evening before getting well on with my C&G work. It's often just 'getting around to it' that's the problem here. Yes, like someone commented, some of the stuff isn't to my taste, but I just bear in mind that I'm learning techniques that I can apply to things I do like in the future. I don't really count much of the C&G stuff as stitching, so to speak, it's just college work!! Stitching is the projects I choose to do!! Yes, I have been known to get sick of gifts as well, although I never make and give something I personally don't like. I can be quite particular about designs, (although I find that less now that I've moved away somewhat from the cross-stich world, with all its holiday and patriotic designs that all leave me cold), but I do like a lot of things and can always find something nice to do for someone. If not, I can design it!=)


Anyway, here's what I did all clumped together in one photo for the time being as no one piece has been completed. There's work on 3 samples/designs here - artwork for all of them (I did one drawing, which isn't finished yet - I want add more detail and make it more 'mature', one pastel picture and 2 collages, although one of these has as much gouache painting as anything!! And I spilled my dirty painting water all over it....) and fabric preparation for 2 - one painted and one bonded. Both of these came out a bit brighter than I really wanted, but it's supposed to be a learning process, so I don't mind that much. I'm more concerned about getting the dratted stuff done, to be honest!

Post Zusammenfassung in Deutsch:

Gestern und vorgestern habe ich viele Arbeit für mein City & Guilds Stickereikurs gemacht. Nichts ist jetzt fertig, aber ich habe der Design und Kunst für 3 Sache fertig gemacht und der Stoff für 2 vorbereitet. Ein ist gemahlt and ein zusammen geklebt.

Ich studiere diesen Kurs bei Harrogate College (eine Berufschule). Es macht mir viel Spass, aber manchmal gefällt es mir nicht so was wir tun muss - zu modern für mich. Ich hab' tradionelle Stickerei am liebsten und fühle oft, dass ich sticken muss was ich nicht besonders mag. Tja, so ist es eben! Ich lerne viele neue Sache die ich später für etwas schöner nutzen kann.=)

中文:

我昨天和前天作了很多学院的事。这种事算是‘功课’吗?=)我读的是刺绣课程。挺喜欢,可是有时候太现代式。我更喜欢的是比较漂亮的东西。

这张照片是最近作的艺术事(设计部分)和准备快要绣的布。

我昨天和前天作了很多學院的事。這種事算是‘功課’嗎?=)我讀的是刺繡課程。挺喜歡,可是有時候太現代式。我更喜歡的是比較漂亮的東西。

這張照片是最近作的藝術事(設計部分)和準備快要繡的布。

Monday, 5 January 2009

Cut-back appliqué sample done

I actually did this sample on Friday night, but had no chance to take a picture in daylight until this morning. I've had a busy weekend, but a very encouraging one and, even though I feel rather under the weather (a bit buggy and very tired), I've made a few important decisions and that feels good!=) I really must get up to date with my C&G work though.... Decided not to apply for the job I was interested in as I'm still very run-down following the burn-out type episode in autumn 2007 and a very demanding 2008, and that I'm not going to use up my precious energy on work when I need it to get better and to devote to more important things.=) I also want to have time and umph for my hobbies and interests instead of just getting in feeling fit to drop.
Anyway, you've seen the acrylic painting I did (2 posts ago) which was prep/design for this sample and here is the photo it came from:

And here's the finished sample, which was stitched with machine rayon thread (yes, on the machine, which was an interesting experience as the feed dogs won't drop, but I found I could move around freely anyway with the darning foot on!!), then cut back to the relevant layer to get the right colour. The green layer is one of the pieces of fabric I dyed a few weeks ago.


Hope to be able to be able to get on with the manipulated techniques sample this week, but I have quite a lot of domestic things to catch up with, so no promises! Haven't done any more on the goldfinches yet, but I might well do over the next couple of days.

I was asked about my music. Well, I haven't really touched my poor viola recently! In fact, I've palyed her about twice in the last month and one of those times was my lesson! The other I did a few scales and exercises and nothing more. I did cut my nails this morning though, so I hope to get some prac in later today. In my last lessons, we did get to the end of Book 2 at last, so I hope to be moving on to Book 3 this year and getting both it and Book 4 under my belt.=) My playing is a lot smoother than it was at the beginning of last year and pieces that looked really hard to me then are now much less challenging. I haven't made great strides, but I have progressed and enjoy it, and that's what matters most.=)

Saturday, 13 December 2008

Dyeing to stitch

We had a go at Procion dyeing in class this Thursday. I didn't have much in the way of interesting fabric to hand and wasn't really in the frame of mind (or body!!!) for anything adventurous, so I just did some random space dyeing with ultramarine, turquoise and a green mixed from ultramarine and lemon yellow. I thought they would be useful for sky and greenery backgrounds and I should be able to use one or two of them in my samples soon.


The weather has been so grey here that it's barely been light enough to take photos, but trusty Photoshop has enabled me to correct the colour casts and show where I am with the band sampler and cross stitch pieces, both of which you can see here.


Jane of Craft Therapy has kindly nominated me in the latest 'Kreativ Blogger' awards, which I've added to the rest of the accolades down the sidebar!! Jane's blog is quite varied, although her main interest to date has been a number of papercrafts. She's done some pretty scrapbooking layouts, greetings cards and ATCs and is planning on branching out into more artwork - drawing and painting.

Monday, 6 October 2008

It's show time!

This weekend was the Fashion, Embroidery and Stitch show up at the Great Yorkshire Showground, Harrogate. I can't say I enjoyed it as much as last year and I didn't feel there was as much for me to buy directly stitching-wise as it's more a exhibit and buy supplies type of event. So, you can get all manner of fancy stuff to stitch with and on, but I confess, I rather wanted to treat myself to a kit or two. Still, time and opportunity enough for that in late November at the Knitting and Stitching Show.=)

What I did get was all either for my C&G course or for stuff for my stand at next year's Staff Festival, if I go through with it. Here are the fabric colours I got, a starter set of dyes and 3 each fabric and silk paints. I just got the basic primaries that can be mixed to more or less anything, but I think I may get the other primaries as well next time - the warmer colours. We'll have to see how I take to it. They weren't really that expensive, but I didn't have enough money to buy any more.

I also got these bits and pieces - soluble film, some small embroidery frames, some roccoco gold thread (the only thing I bought for personal project interest), a fat quarter of silk habotai ready for the silk painting stuff and some buttons. Here's a close-up of the buttons as well, as they're really cute! They're for small, garden-ish embroideries I'm hoping I may be able to sell. Knowing me though, I'll probably never get the time to do them and, even if I do, I don't dare hope to really be able to sell very much! I'd have to charge quite a lot, even for a simple piece, in order to make it worth my while.

No more C&G work or other stitching to show as yet as I've had the most yacky cold etc. Quite a few in my circle have been down with it and it's the type that seems to get better, then flares up again. Anyway, I'm hoping that I'm at the end of it now and can get back on.

 
Google+