Showing posts with label ST7. Show all posts

Friday, 1 March 2013

Finished in February

(Incorporating this week's Work in Progress Wednesday and Sunday Yarn postings!)

These were the goals I set myself for February, complete with photos on progress etc:

* Finish the rabbit - done!  I finished this yesterday, on 28th, so it just qualifies for Anna Scott's Finished in Feb challenge (and I'll post the photos there soon too...)

This was how far I'd got at the beginning of the month:


And this is how it looks finished:


With a side-on shot to show clearly the raised elements:


I just need to decide what to do with it and who to give it to.  A Chinese friend has just been telling me how much she loves it and wants to see what it looks like in her room, 'wants that rabbit' etc, but I'm not quite soft enough to give in to that.  I'll decide who it goes to and, as I was taught never to ask for things, but always to wait until offered ("'I want' never gets" was one of my mum's favourite phrases!!), it won't go to anyone who tries to wangle it out of me!!=)  Besides, she was waggling away at the raised ear and, if it was in her possession, I'd give it a week before the wire was through, she'd be forever fiddling with it!  You know how some people just cannot seem to keep from playing with things like that?  Well, I won't be giving stumpwork pieces to them....

* Finish the feather I wish I could say this was done too, but it's only got this far after, I think, two sessions:


* Finish the peach baby knit  I'm almost done with this, coming up to 95%, and indeed would be done if only I hadn't felt that getting all the neck edge on one straight needle was going to be both uncomfortable to work and would over-stretch the button bands.  I'm going to get a circular needle to work it on.  Wouldn't you??


So, during the month, I finished the front as far as I could, did both the sleeves, then also did the button band and buttonhole bands.  

* Try some of the cabling pattern samples in the book  Didn't get to this.
* Try some miniature bedding ideas now I've got some fabrics for them  Didn't get to this either.
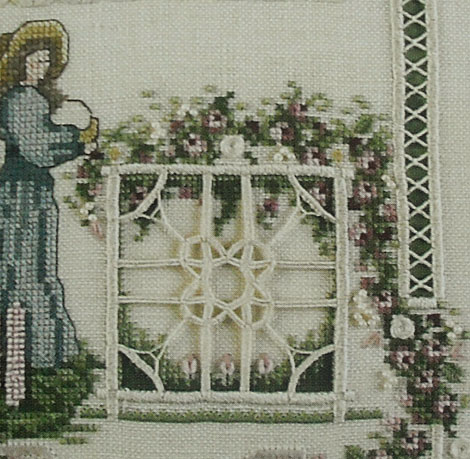
* Get to '50% complete' level on sampler  I think I did manage this one.  Here are the month beginning and end photos (nothing new as I haven't touched it since 12 Feb!):


* Make a start on one or two projects from the embroidery list - when first two on this list are done!  Didn't finish anything in time to start this.
* Continue CED challenge  Yup, keeping up, no problem.  Creativity is to found in so many areas that it's almost easier to do it than not!
* Report back on 1 March and continue to post regularly in the meantime.  Doing so right now and made 8 posts during the month.  Not too bad - an average of two per week.

I've decided not to set any goals for March as I'm feeling really weary after so many colds etc and I don't need the stress of feeling I have to do certain things at the mo.  I'll probably do them anyway, but I felt quite a lot of pressure to meet goals towards the end of last month and didn't have the energy to put much time in on them, so it was disappointing in the end.  So, I'll give myself a breather for now.

Text and images © Elizabeth Braun 2013

Wednesday, 20 February 2013

Work in Progress Wednesday - 20 Feb 2013


After the last two fairly mammoth progress posts, it's a shame to just have the above to present to you this Wednesday!  It's all the embroidery I've done in the past week - just one session on the brown parts of the ear, and not very well worked at that!  Still, it's not finished yet and the rubbishy bit can be covered up OK.

If I'm to meet the 'deadline' of Anna Scott's (yes, the editor of 'Inspirations' magazine) 'Finished in February' challenge, then I need to get on with this, but as things are a little more settled at the mo, I should be able to do that.=)  Hope to get cracking again later today and I shall need to as I have 3 finishes planned for this month and will be most put out if I can't complete at least 2 and have the 3rd at 90+%, preferably 100%.

Text and images © Elizabeth Braun 2013

Wednesday, 13 February 2013

Work in Progress Wednesday - 13 Feb 2013

I've been looking forward to Wednesday this week so as to be able to post about all these projects!  This makes a pleasant change as, so often in the recent past, I've been wondering what I was going to scrape together for a WIPW post!!

Again, I've worked on all three projects and made what I feel is significant progress with them all.=)

First up, the old peacock feather. This one is progressing the most slowly, but then I actually work at this one at my desk as it's helpful to have the table there to both lean the hoop on so that I have both hands easily free to control the springy rayon threads and also somewhere to lay out said threads without having to put them in an awkward place.  It's not as easy to work in there at times.

As the Chinese say, 话说回来 (speak speech come back - 'having said that'), I have done some on it and feel that it's beginning to take more shape now.  There's still plenty to be done (sigh!  I'm longing to get this one off the list!), but it's coming along at long last and that's all to the good!

Now, on to the rabbit and here's a little someone whose also taking shape rather well.  First, I finished off the shading (although a few more pieces were put in after this photo to plug up a few gaps and thin patches.


Then along came the fluffy tail!  I took a lot of WIP photos of the process, so there'll be a tutorial coming up on how to make fluffy patches, i.e. ghiordes knot stitch.  There are some more to do for the garden patch of this piece, so I'll wait until that's done and I can show more uses of the stitch.


This is the detached ear in progress.  WIP photos are also collecting nicely for it so that I can do the long-delayed 'wired fabric elements' tutorial as a complement to last year's popular 'wired needlelace elements' tute.  That'll come when the butterfly (next stumpwork project) is done and, again, various uses can be shown.

Now for the sampler and I've had a very green week where every single stitch has been green!  This series of three photos shows how much work was done in each of the three sessions I've spent on this piece:


Finally, here is the overall look of the piece right now.  It looks a bit dark towards the top as the fabric is loose there just now - I only put the top gripper on when I'm working on it so as to reduce pressure on the stitches there as some are covered by it.


This coming week will, I hope, see the rabbit piece finished, the left hand side of the feather done and the rest of the green work completed on the sampler, which includes replacing the lettering with dark green.

What have you got planned for this week?

Text and images © Elizabeth Braun 2013

Wednesday, 6 February 2013

Work In Progress Wednesday - 6 Feb 2013

Wow, look!  I've got progress photos on all three projects to show you today!  I'm delighted!=)

First of all, on the left you can see the current status of the peacock feather piece.  I put in two lengths of green-mix couched threads along the left hand side, also adding a little bit of satin stitch where they meet the 'stalk' so as to fill in the gap a little and create the right shape.

The next move is to add in a more brown row and then to do the fronds that begin to splay out somewhat.

It's not easy doing a peacock feather as so many of the colour changes are along the fronds, (or whatever I should call them - I'm no ornithologist), so it's not really possible to get them exact - unless one were to specially dye threads for the design.


Next is the turn of our lovely, cute, chubby little bunny.  As you can see, I made quite a lot of progress on him yesterday (you get a lot more done by not watching TV at the same time....) and hope to finish the shading completely during the next session I spend on him.  Then it's on to the ghiordes know tail and I think I'll make a tutorial out of that, so I'd better do it in good light!=)


Last, but by no means least, is the sampler.  Yesterday afternoon I started and completed the extra trims on the rose cross stitch area that I showed last time.  There are two shades of beading, two fly stitch leaves, two spider's web roses and a few lazy daisy stitch petals.


Here's the full length of the piece as it stands right now.


As I'd got about as far down on the piece as I could go, I've moved it up in the frame now.  I'm not sure how well that will work out as I don't think it's far enough up, but it can't go any further thanks to the beading on the top section.  I may well have to re-transfer it back to the 17" side bars, which fit in the whole design.  We'll see how it feels as before I didn't find it comfy working in such a very long frame.

I've decided I don't like the colour of the lettering.  It doesn't look as bad here, but in real life the purple is too red and doesn't match well.  It looks fine on the lilac background, which is an alternative on the pattern, but I think that, on green, the lettering should be either dark green, brown or even grey.  I'll wait until I've worked the rest of the surface elements before making a final decision on colour, but it's not staying as it is.  I just don't like it at all!

Something else I'm not sure of now is what colour to work the girl's dress in.  She's to appear in the space on the left of the square and the pattern states a blue dress, but I don't really think it goes well with the rest of the colour scheme (nor do some of the lupins, which are also supposed to be blue, but that I will be changing to be pinks and purples as on the cream based version of the design) and am considering changing it to light yellows instead.

So, over the next week I hope to complete the left hand side of the feather, the body, tail and perhaps also the wired ear of the rabbit and press well on with the rest of the pictorial part of the sampler.

I've also selected my next WIPW big project as, according to the challenge guidelines, the project should be at least 20 hours long and so, for starting new ones, I want to make sure that WIPW is my weekly larger project update.  So, after the sampler come a pair of rather nice cross stitched ladies - one medieval, one Tudor - with all sorts of fancy elements including rayon threads, beading or various sorts, petit point faces and hands and so on.  So, not your ordinary cross stitch, but with something a little special.  NOT that there's anything wrong with cross stitch!  I remembered feeling quite disgusted when someone spoke disparagingly of 'cross stitching bears'.  All forms of embroidery are worthwhile and valid and it doesn't matter who designed it or whether it's worked for fun or for serious business, commission, study or exhibition.  The only time I would find something questionable would be if the subject matter was distasteful in some way.  So there!  Cross stitch is great!=)  I love all forms of stitchery and am happy to indulge in any that take my fancy at any given time.  No snobbery allowed here!!!LOL :)

Text and images © Elizabeth Braun 2013

Wednesday, 2 January 2013

Work in Progress Wednesday - 2 Jan 2013

The first WIPW of the year and I have a few photos to share with you!  I resisted the temptation to include any of these on yesterday's year review posting, although it certainly was there for the 'completing current WIPs' section of the 2013 goals list.

As you can see here, I've been pressing on with the shading on the rabbit's body.  I drew in some lines in pencil on the felt and fabric and then started by putting a few key guidelines in using the darkest shade.


In this shot you can see the second darkest shade starting to make an appearance and you can also see that I took the photo in different light from the first two shots!!  It's hard, when you're stitching at different times of day and at a time of year when some whole days never seem to get fully light, to keep the lighting standard.  No matter how much editing one does, there's still a clear difference.


This last shows the third darkest colour making it's debut.  Of course, against the two very darkest, it looks rather pale!


I still have rather a long way to go with it - almost half the body is untouched and the bit that is done is not done completely - you can see the padding and backing through it, so I need to go over it in good light and stop up some gaps.

The sampler looks like this at present, with one of the long satin stitch panels done.  I haven't put in the few stitches across the bottom as I want to re-count and check that the number of stitches, (173, I think), is correct.  It will matter as this section is to be filled every so many threads with a decoration, so getting it right is definitely the best way to go.  I left it for another time as I was quite tired by the time I'd got to that point and was packing up for the night.

It looks rather pulled to one side at the moment...=(

Hope I'll have more to show off on both of these and, if some miracle happens, on the feather as well.  I'd dearly love to get that finished and OFF my desk and 'to do' list, but I can never seem to find the motivation to make it so.

Sigh!

Text and images © Elizabeth Braun 2013

Wednesday, 19 December 2012

Work in Progress Wednesday - 19 Dec 2012

I nearly didn't have anything to report, but I've just finished re-stitching the head section on the rabbit piece and also added in the eye.  I think it looks a little odd at the mo, but feel sure that it'll look much better when all the rest of the shading is done.


Probably the main plus is that I actually got it going again!=)

I also finished off the mittens for my green baby layette this afternoon and just need to get ribbon and buttons for that and the matching jacket, which won't happen before Sunday, but I'll be able to show off something anyway.=)

Feels good to get things moving forward, esp. as both of the above mentioned projects are on my to complete in 2012 list and there are only 12 days and 6 hours left of the year....  That's also part of the reason why I haven't been doing as much textile work - I've been trying to complete some of the study tasks too!

Of course, next year's list is already done and ready to go live in 1 January and contains a few things that won't get done, or finished, this year.

Text and images © Elizabeth Braun 2012

Wednesday, 28 November 2012

Work In Progress Wednesday - 28 Nov 2012

YAY!  Some embroidery progress to post!  YAY!=)

First up is the sampler on which I've made a bit of discernible progress.  In the first photo you can see the spider web roses, the cream beads (instead of palestrina knots, which I can't seem to get to look decent and so refused to fight any further with), the three 'boxes' for more cutwork and the start of the next row.


This second shot shows where the project is right now with a row of double pekinese stitch and one of feather stitch also completed.


I'll soon be coming to a small decision point as, as you can see from the photos, the variegated thread I've been using thus far is a cool green and wine purple mix.  In the pattern, this shade continues only on to the next row, then it changes to a more olive green with petrel blue mix.  I'm considering whether to change shades as per the chart, or to keep it all one.  I love purply shades and so am tending very much towards not making a change.  Of course, I only bought these two skeins of thread to go in this design and have no other real use for them, which is a small argument in favour of changing, but having said that, I'll no doubt try and sell one or both of them anyway once this sampler is complete (they're Needle Necessities threads and hard to come by, so may well find a buyer as past sales have shown), so one skein being complete may be good. You can see the colours in this photo.  What do you think?  Would you stick to one shade or go for variety?

Another change that I certainly will make is the large square cutwork section in the lower part of the design.  You can see here in the left hand photo that the cream one is done like a gate with garden showing through, whereas the lilac (and green) one on the right is just done as a piece of fancy work.  I must say that I prefer the more realistic one and am almost certainly going to do that version instead.  99.9% certain, I would say.  The flowers you can see through it are worked on a separate piece of linen, then attached to the back of satin stitches and the whole thing seems to fit better to me.  What do you say?

I haven't done much more on the other two projects yet, but those of you with good memories may recall that I wasn't pleased with the shading - the darkest colour wasn't dark enough as I'd picked the wrong one.  So, I took that colour out and here's bun, ready to have the dark patches on his jaw and around his eye restitched, bless him!


What have you been working on this week??

Text and images © Elizabeth Braun 2012

Wednesday, 31 October 2012

Work In Progress Wednesday - 31 Oct 2012

Another Wednesday and here's the current state of play on my Works in Slow Progress. First of all, the sampler:


I've done a slight bit more than you can see here since the photo was taken, i.e. have put in the lazy daisy stitches on the rest of the upper left hand bit of the rose scroll.  You might notice that I decided to replace those erroneous blue stitches after all and I think it looks a lot better now.  The blue didn't make a good contrast, it just confused matters and it looks a lot more like roses now, instead of just clumps of dots!

I also got the stumpwork rabbit going again.  Here's the photo from the book I'm working from with all the threads I'm using as well.


I completed the shading of the head as you can see.  However, I'm not at all pleased with it and am seriously considering starting all over again with it.  I certainly do want to re-do the lower part of the head and the eye area as I've not used dark enough thread - I used the second darkest instead of the very darkest, but it needs to recede somewhat, being the furthest part away.  So, that's up to be re-done.


I haven't done anything on the peacock feather as yet as I haven't been out to get the 9" hoop, (which I'm assured can indeed be bought from Hobbycraft - there weren't any available when I was buying all my hoops a few years ago), but I hope to do that soon.  I'm not in the market for any fancy frame systems and I find wooden stretched frames much too heavy for me to hold and need too much umph to get set up.  So, I'll get the missing size of hoop.  I like hoops.  If they're good enough for the likes of Helen M Stevens, then they're good enough for me!=)

Text and images © Elizabeth Braun 2012

Tuesday, 24 April 2012

Manicure Pouch - Finished Up!

At last, it's done and even worked out a little better than I'd feared, although I can't say it's quite what I would have liked, but putting piping around the edge was beyond me this time.  I could make the cording OK, but attaching it was more than I was prepared to risk with something that's meant as a gift.  Sometimes I miss City & Guilds ... (the experimental aspect, plus a room full of people who may have more of a clue, and a teacher, and the fact that it's only a piece of coursework and hasn't spoiled someone's pressie...)

So, as promised, here's the whole process:


First I cut some pieces of heavy interfacing to match and backed both the embroidered panels and the corresponding sections of the lining.  The reason for this, and the gap between the panels, was to produce a folio that wasn't too floppy and that could close well.


I next got the contents of the set out and laid them out on the lining, followed by pinning the elastic that would hold them in place.  I know this isn't really the most glam way of doing it, but I couldn't think of much else (except for things that were really too hard me to attempt at the mo).  It could be worse, I suppose..


Above is the elastic stitched in place and, boy, was it hard to keep it reasonably straight!  It had a real craving to go up at each end.  It does a little, but not too badly.


These two shots show (above) the embroidered bit and the lining tacked right sides together, and (below) the proper sewing in place around three sides and a little bit at the outer edges of the bottom as well, plus the excess fabric trimmed away.  What you can't see here (and I didn't take photos of as it was done in poor light) are the ties which are sewn in.  Of course, I didn't think it through properly the first time and ended up sewing one on the inside.  Duuh!  I'm wondering what's happened to my poor old brain of late....


And here is the finished item after having been turned the right way around again, corners pushed out, bottom edges pressed and slipped stitched in place, and a final pressing and rub over with a bit of Sellotape to get the dusty bits off that were beginning to make it look grubby.


(Edit in the summer after handover:  Rosie said, "You are amazing" in response to receiving this, but I think that refers better to my having remembered a many-years-old promise, than to my abilities...  Nice to hear, nonetheless.)

It feels good to have a proper finish and something I can cross off my 2011/2 Goals List, especially as I can't seem to get into my other pieces over much just now.  This is as far as I've got with the rabbit:


She who wrote the article on getting stuff finished is struggling to take her own advice.  Hmmm!=)

Text and images © Elizabeth Braun 2012

Thursday, 22 March 2012

Small steps on the stumpwork bunny

Here's a little update on the stumpwork bunny.  I haven't done a great deal more on him - I've been busy with other things (including making a start on finishing up the dog rose piece and getting the fabric sorted and framed up for the counted piece), but here's what's been happening with him.

First of all was the padding of the body in the following two stages.  As you can see in the first photo, the felt is simply stab stitched into place.  The larger piece is then attached over the top to create a decent height.


The next stage was, following the rules of needle-painting, to outline the farthest element - in this case, the flatwork ear (the other is wired and raised).


The next stage was to shade in that back ear, for which I used three shades of bronzey-brown.  Then I moved on to outlining the whole head and body ready for filling that in.  The body will be stitched as normal just over the padding.  This is where the piece has been left for now.  The gap at the bottom is where the fluffy white tail goes.=)  (I'll be glad to get to that bit....)


I meant to do only 15 minutes on it today before moving on to making a start on the stitching on the 'Sunshine and Flower' design, but it took an hour to finish shading the ear (from where I'd left it the time before) and then do the outlining!  Never let it be said that embroidery is for anyone lacking in patience!

© Elizabeth Braun 2012

 
Google+