Monday 20 March 2017

Finishing up some older projects

I think many, if not most of us have some little itsy-bitsy things hanging around waiting for us to finish them, or finish them into something once the actual stitchery is complete.  I had a few of these and so, once all the wedding pieces were done, I had a bit of a finish-a-thon.

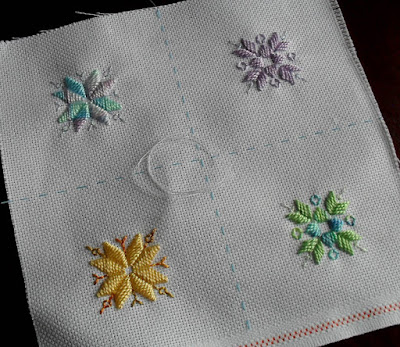
Long term readers may remember some, or even all of these pieces.  The first ones, the four tiny hardanger cards shown part worked here, I posted about around the turn of 15/16.  I had put the beading on sometime in the latter half of last year at some point when I actually wasn't in the depths of Intensive Project Hell, where I spent at least 3 months of 2016 (no wonder it was such a productive stitching year!), but I just hadn't mounted them into cards.


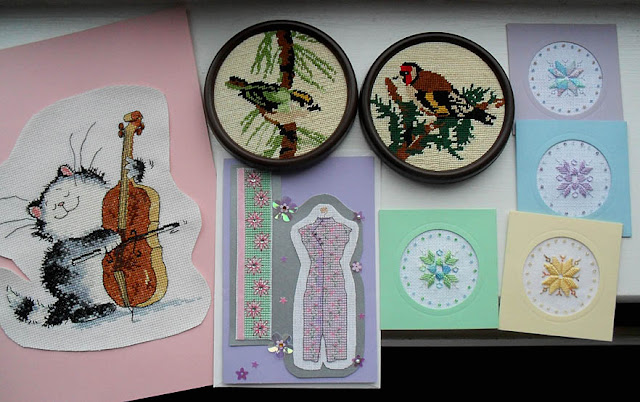
On one day, I mounted the four hardanger cards as well as the two old needlepoint birds in the frames that came in the kits, including giving them felt backings.

Mounting the other two cross stitches was quite easy using an iron as they're first put onto fusible webbing/Bondaweb, (which I had to buy a new supply of as I'd run out) but the paper not peeled off.  I then stuck them onto the relevant pieces of card, trimmed up the dress one and set the cat-a-cello (which my friend, Katy worked for me years ago) aside in a plastic pocket ready to go in the front of my long nelgected music folder.  I'm not exactly thrilled with the results of the dress card - it's too bitty and disjointed for my tastes, but I'm sure someone'll love it!

My project box was a great deal emptier for being able to move these eight items out!  There were nine things to be done at that point, the ninth being the lilac bellpull I shared a few weeks ago.

That's it for project catch up blog-a-thon - the series of almost 20 bi-weekly posts that have been needed to bring you up to date with my projects.  I hope you've enjoyed all these pieces. ☺. I can't promise such regular amounts of eye candy from here onwards, but there'll be things to see as I get pieces ready for this summer's show(s) and other things.  Let's see what we can come up with!

Text and images © Elizabeth Braun 2017

Friday 17 March 2017

Lauren's Wedding Card etc

At the Knitting and Stitching Show, I had fun with a Rowandean 'make and take' piece again this year, having already decided to use it for a wedding card to go along with the dress panel and bellpull.

It was worked in about three sessions - two of them at the Show.  I did a bit, went off to look around again, then came back and did some more, then took it home to finish off.  Problem was that, as I'd left it in the hoop at the stand the first time I took a break, I forgot to take it out of the hoop when I was leaving the Show with it and, consequently, waltzed off with one of Katrina's hoops!  I realised what I'd done shortly afterwards and posted it back to her, so I hope she got it OK...

I didn't get any WIP shots this time, but here it is before and after the main fabric was trimmed to a heart shape and mounted onto a card.  As you can see, I chose a very different colour scheme from the last time I did one of these.


I love these little pieces and fully intend to do another one at this year's Show.

I needed to wrap the bellpull up somehow, but didn't want to roll it or risk it getting folded.  So, I cut a piece of purple card - the same cardstock as I'd used to mount the Rowandean piece on, and used that to support it.

The hanger hung comfortably over the back and I prepared and printed some care instructions to stick on the back of the cardboard too, so that the new owners know how to wash and iron it if ever needed, i.e.hand wash in cool water and press from the back onto a thick towel.

I found some terrific clear wrapping plastic at Wilko's instead of the usual patterned paper.


The last stage was to paint a plain, manilla A5 envelope with lilac metallic fabric paint (I don't have metallic regular stuff.  I don't paint much), put the card in that and then fasten them together with a little bit of double sided tape in between the two, and then attach this ribbon.

And that's the last of the African wedding series.  Hope you've enjoyed it.  It was nice doing three such very different pieces.  I felt I was able to give dear Lauren a little bit of everything. ♥☺♥

Text and images © Elizabeth Braun 2017
Monday 13 March 2017

VS Renaissance Rose bellpull - finished up

Here we are at the finish line for this project.

As this design was for a framed piece whilst I wanted to make a bellpull out of it, I needed to adapt the bottom.  It wasn't terribly difficult - I just needed to add a row of buttonhole edging around the outside of the hardanger section and then, using the new edge this created to site a row of four-sided edging on each side.  When this had got to the needed height, I just turned the top over a pretty hanger I got at the Knitting and Stitching Show in November.

And that was it!


Here the purple card back makes a nice contrast and shows off the cutwork section nicely.  I actually used this type of card as a support when packing up the bellpull, which you can see next catch up project post when I also share the wedding card.

Text and images © Elizabeth Braun 2017
Friday 10 March 2017

VS Renaissance Rose Bellpull - bullions!


I mentioned in my last posting on this project that I'm often wary of bullion knots.  I think that, with a combination of Kathy's extremely helpful, 'alternative' method of working them (compare how the needle is held in this, more traditional approach, which I find overly awkward to work and leads to puckering)and the sheer quantity of knots that I had to work on my one and only piece of Brazilian embroidery and the 'Sunshine and Flowers' sampler, I've managed to get a fair grip on how to get them to work out OK.  I was really quite pleased with how the majority of these came out.

Having said that, I still wouldn't call myself confident with them, but I'm certainly getting there. ☺  I need to try the same do it over and over again method with cast on stitches and flowers next as I'd love to master those.

You may have noticed especially in the big heart, but also in the other two, smaller motifs with the bullion roses, that there were some pink lazy daisy stitches to insert too, which also add variety and balance to the piece.  Having said 'balance', I realised, looking at this photo, that the roses are much more numerous on one side than the other, but oddly, I didn't notice when looking straight at it.  Maybe this angle of photo has highlighted it.


This is the last section, (which I actually did first) and you can also see that I also worked the outer border as far as I could ready to make the piece up into a bellpull.  The original design was to be framed, so I had to think carefully about how to go about it.  More on that in the next in this series.

Text and images © Elizabeth Braun 2017

Monday 6 March 2017

VS Renaissance Rose Bellpull - part one

Thanks SO much for all the kind compliments on the last finish - and also all the way through the project.  And now, welcome to a new project series!

Before she approached me about her wedding dress panel, Lauren said she and her fiancé would like a bellpull with a favourite Bible text for their home as their wedding gift.  I chose the absolutely gorgeous Renaissance Rose design from Victoria Sampler to adapt for this piece.

Here's the initial floss toss and, with the exception of deciding against the gold shades in favour of the aubergine cord, this is pretty much what I used - for a wonder!  I normally chop and change several times during the process.  Do you?  Or do you stick fairly closely to the pattern and/or original palette?

As you can see, I opted for 8 shades of Coton à Broder #25 from DMC and Anchor.  The fabric is 28ct congress cloth (I think) in an ecru shade with which I used Anchor Pearl Cottons #8 and #12 in shade 926.


A quick comparison with the chart photo shows that I needed to start out with a little adaptation of the original design in order to meet the requirements.  I decided to replace several pattern rows in the middle, including the 'For You' bit with the scripture they wanted and also to move a cross stitch floral line down to make the text section framed by a similar motif.  It took a couple of goes with a piece of graph paper to get the lettering charted correctly, but it wasn't too big a challenge - especially not after the last project!


After the middle section was complete, I filled in the surface work on the lower half, including the beaded parts, (using good old Mill Hill petite seed beads, which I'm a big fan of), but not the bullion knots which I'm always a little wary of and decided to leave until last.  I hadn't ever thought of doing it before, but I love the section of ecru four-sided stitch in the section above the hardanger heart.  I think it adds a great textural element.


Next came the top few motifs, including the leaf and bead 'frame' for the lovely heart motif.

I then did the cutwork section on the lower heart, as you can see below and even remembered to take some photos at this point.  I didn't take as many WIP shots as I would have liked of thie piece and some were too poor to do anything with other than to delete them!

Here's the piece at the point that we'll leave it for this post and next time I'll show you the bullion knot sections.

I loved this project and I'd really like to do another one, perhaps on bright white fabric and with yellow flowers.  I would very probably want to keep that, but it would be a strong candidate for exhibiting in the summer shows.

Text and images © Elizabeth Braun 2017

Friday 3 March 2017

Wedding Dress Modesty Panel - fitting and wearing

Here's the last instalment in the adventures of a wedding dress modesty panel.  I'm not involved in any of this section - except that I took one of the two wedding screenshot photos.  All other photos etc in this post are from the bride's family and friends over in Ghana on the Big Day.

The bride's dad sent me this lovely shot of her getting out her dress and receiving the modesty panel ready for fitting.  It came along with a heart warming message:

"Lauren really happy with your work. Thank you soooooo much."

In the same photo batch came this one of fitting in progress.  Janet, the bride's mum, is a very accomplished seamstress who also made a Ghanaian style outfit for herself for the day. ☺


And here it is in action!  Photos etc were coming in during the ceremony to all Lauren's friends here in the UK and I was busting with flattered vanity when I saw that she had deliberately sat during the ceremony with her hair on one side so as to show off the panel - the one that was meant to be hidden!! ☺♥☺

It did get hidden during the more 'active' parts, but you can see a tiny bit of it here during the wedding vows (my screenshot photo).


"Screenshot?  How come?"  I hear you ask?  Well, as so many family members and friends weren't able to go over to Africa for the wedding, the whole ceremony was streamed live via YouTube and left on for catch up later for people who weren't able to join at the actual time (including us).

In this scene - the legal registration required by Ghana law before the religious ceremony, you can see dad in the background holding up his phone so that the bride's eldest brother, who lives in China, could 'be there' in real time.  On the other side was her 2nd brother enabling their 3rd brother (who has a tiny daughter) and maternal grandparents back home in the UK via his phone.  It was a truly intercontinental event!  Marvellous! ♥


Along with these two beautiful photographs that came from the newlyweds a few days later, I got a lovely recorded message telling me that many people had commented how nice her dress was at the back. (Vanity swells again!!)

A most successful project, I think.  The fact that people were complimenting her on the appearance of the panel means that it served its purpose well and that no-one was offended by too much skin in the wrong place.  That was the main thing.

Of course, I'm delighted with the results too. ☺  I'm wondering now if I'll ever get chance to do any more projects like this....

I'll conclude this project with this Very Lauren screenshot from the wedding talk. ☺♥☻

The card and 'regular' gift coming up next!

Text and images © Elizabeth Braun 2017

 
Google+